
What Is the Osmosis Analyst MCP?
The Osmosis Analyst is a hosted MCP (Model Context Protocol) server that connects your AI agent directly to Osmosis. Once connected, you can ask your agent about institutional allocators — pension funds, endowments, sovereign funds, and more — and it pulls answers straight from the Osmosis dataset.
It surfaces the same intelligence that powers osmosis.fm: allocator profiles, board and investment meetings, personnel moves, board rosters, consultant activity, and strategy signals across asset classes like private credit, real estate, and infrastructure.
What you can ask
- Find and profile allocators — pension funds, endowments, sovereign wealth funds, and more.
- Pull board rosters and personnel moves — who sits on a board, plus recent hires, departures, and role changes.
- Review recent meetings — board and investment-committee meetings, with analysis.
- Track strategy signals and consultants — allocator activity and consultant mentions across asset classes.
The Analyst works with any MCP-capable client. These instructions cover Claude Desktop (recommended), ChatGPT, and Microsoft 365 Copilot, with Claude Code as an alternative for the command line.
This MCP exposes the Analyst’s data tools. The full Osmosis Analyst at osmosis.fm unlocks pro features the raw tools can’t: a proactive auto-analyst that surfaces signals for you, source-citation browsing that traces every answer back to its document, and guided research journeys like meeting briefs and strategy recaps. Explore the full Analyst →
What Is the Osmosis Analyst MCP?
The Osmosis Analyst is a hosted MCP (Model Context Protocol) server that connects your AI agent directly to Osmosis. Once connected, you can ask your agent about institutional allocators — pension funds, endowments, sovereign funds, and more — and it pulls answers straight from the Osmosis dataset.
It surfaces the same intelligence that powers osmosis.fm: allocator profiles, board and investment meetings, personnel moves, board rosters, consultant activity, and strategy signals across asset classes like private credit, real estate, and infrastructure.
What you can ask
- Find and profile allocators — pension funds, endowments, sovereign wealth funds, and more.
- Pull board rosters and personnel moves — who sits on a board, plus recent hires, departures, and role changes.
- Review recent meetings — board and investment-committee meetings, with analysis.
- Track strategy signals and consultants — allocator activity and consultant mentions across asset classes.
The Analyst works with any MCP-capable client. These instructions cover Claude Desktop (recommended), ChatGPT, and Microsoft 365 Copilot, with Claude Code as an alternative for the command line.
This MCP exposes the Analyst’s data tools. The full Osmosis Analyst at osmosis.fm unlocks pro features the raw tools can’t: a proactive auto-analyst that surfaces signals for you, source-citation browsing that traces every answer back to its document, and guided research journeys like meeting briefs and strategy recaps. Explore the full Analyst →
Before You Begin
You’ll need a few things in place before connecting:
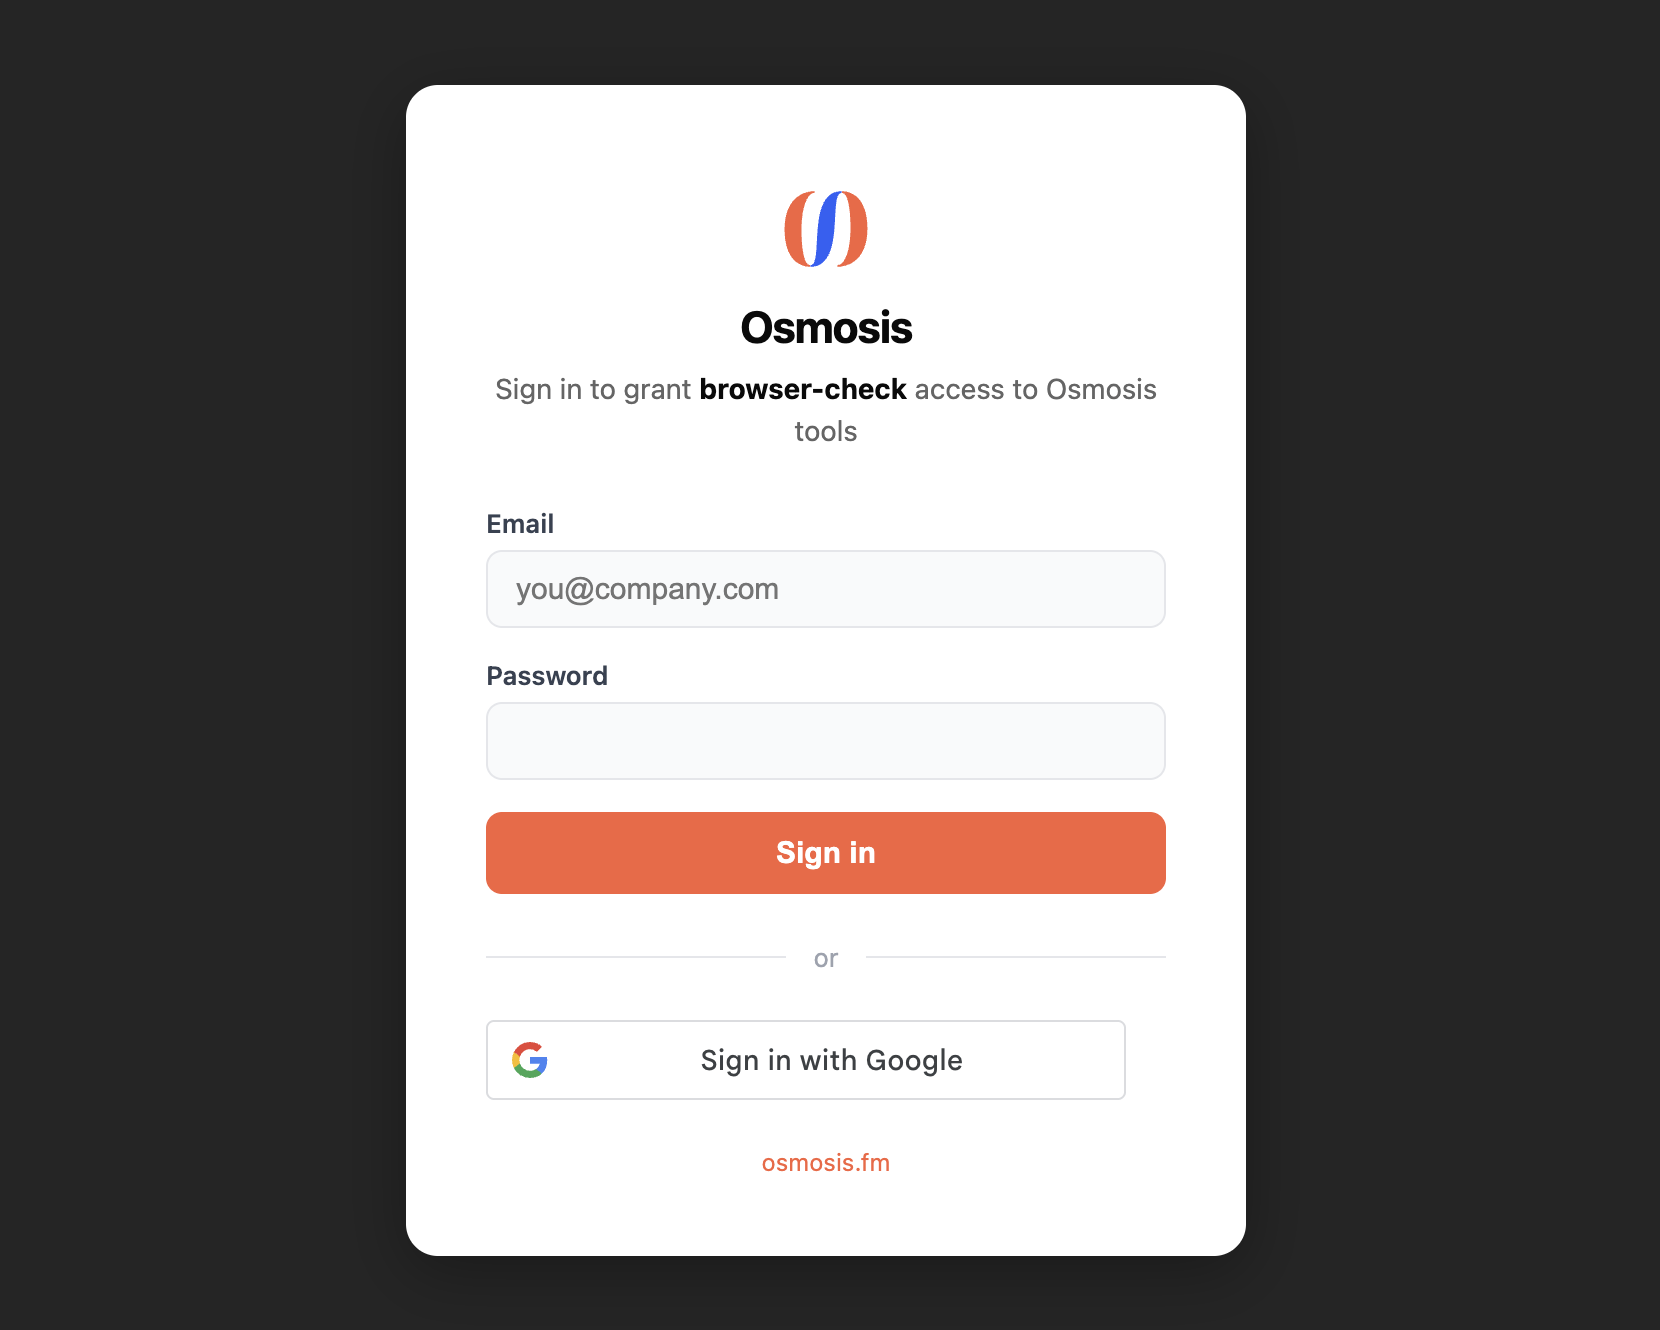
- An Osmosis account — sign in with the same email and password you use at osmosis.fm, or use Sign in with Google on the account tied to Osmosis.
- A supported client — Claude Desktop or claude.ai (any plan, including Free), ChatGPT (a paid plan), or Microsoft 365 Copilot. Claude Code also works if you prefer the command line.
- The Analyst’s server URL, below.
Server URL
https://mcp.osmosis.fm/mcp/toolsThere’s no API key to copy or paste. The first time you connect, you sign in through your browser with your Osmosis account, and your client stores the session for you.
Before You Begin
You’ll need a few things in place before connecting:
- An Osmosis account — sign in with the same email and password you use at osmosis.fm, or use Sign in with Google on the account tied to Osmosis.
- A supported client — Claude Desktop or claude.ai (any plan, including Free), ChatGPT (a paid plan), or Microsoft 365 Copilot. Claude Code also works if you prefer the command line.
- The Analyst’s server URL, below.
Server URL
https://mcp.osmosis.fm/mcp/toolsThere’s no API key to copy or paste. The first time you connect, you sign in through your browser with your Osmosis account, and your client stores the session for you.
Connect with Claude Desktop (Recommended)
The easiest way to connect is through Claude Desktop — no command line required. You add the Analyst as a custom connector from the Customize menu, sign in once, and it’s available in every chat. The same steps work on claude.ai in the browser.
Custom connectors using remote MCP are available on the Free, Pro, Max, Team, and Enterprise plans. On the Free plan you can configure only one custom connector. On Team and Enterprise plans, only an Owner can add a custom connector — once they do, you connect and sign in yourself.
1. Add the Osmosis connector
Open the Customize menu
In Claude Desktop, open Customize and select Connectors.
Add a custom connector
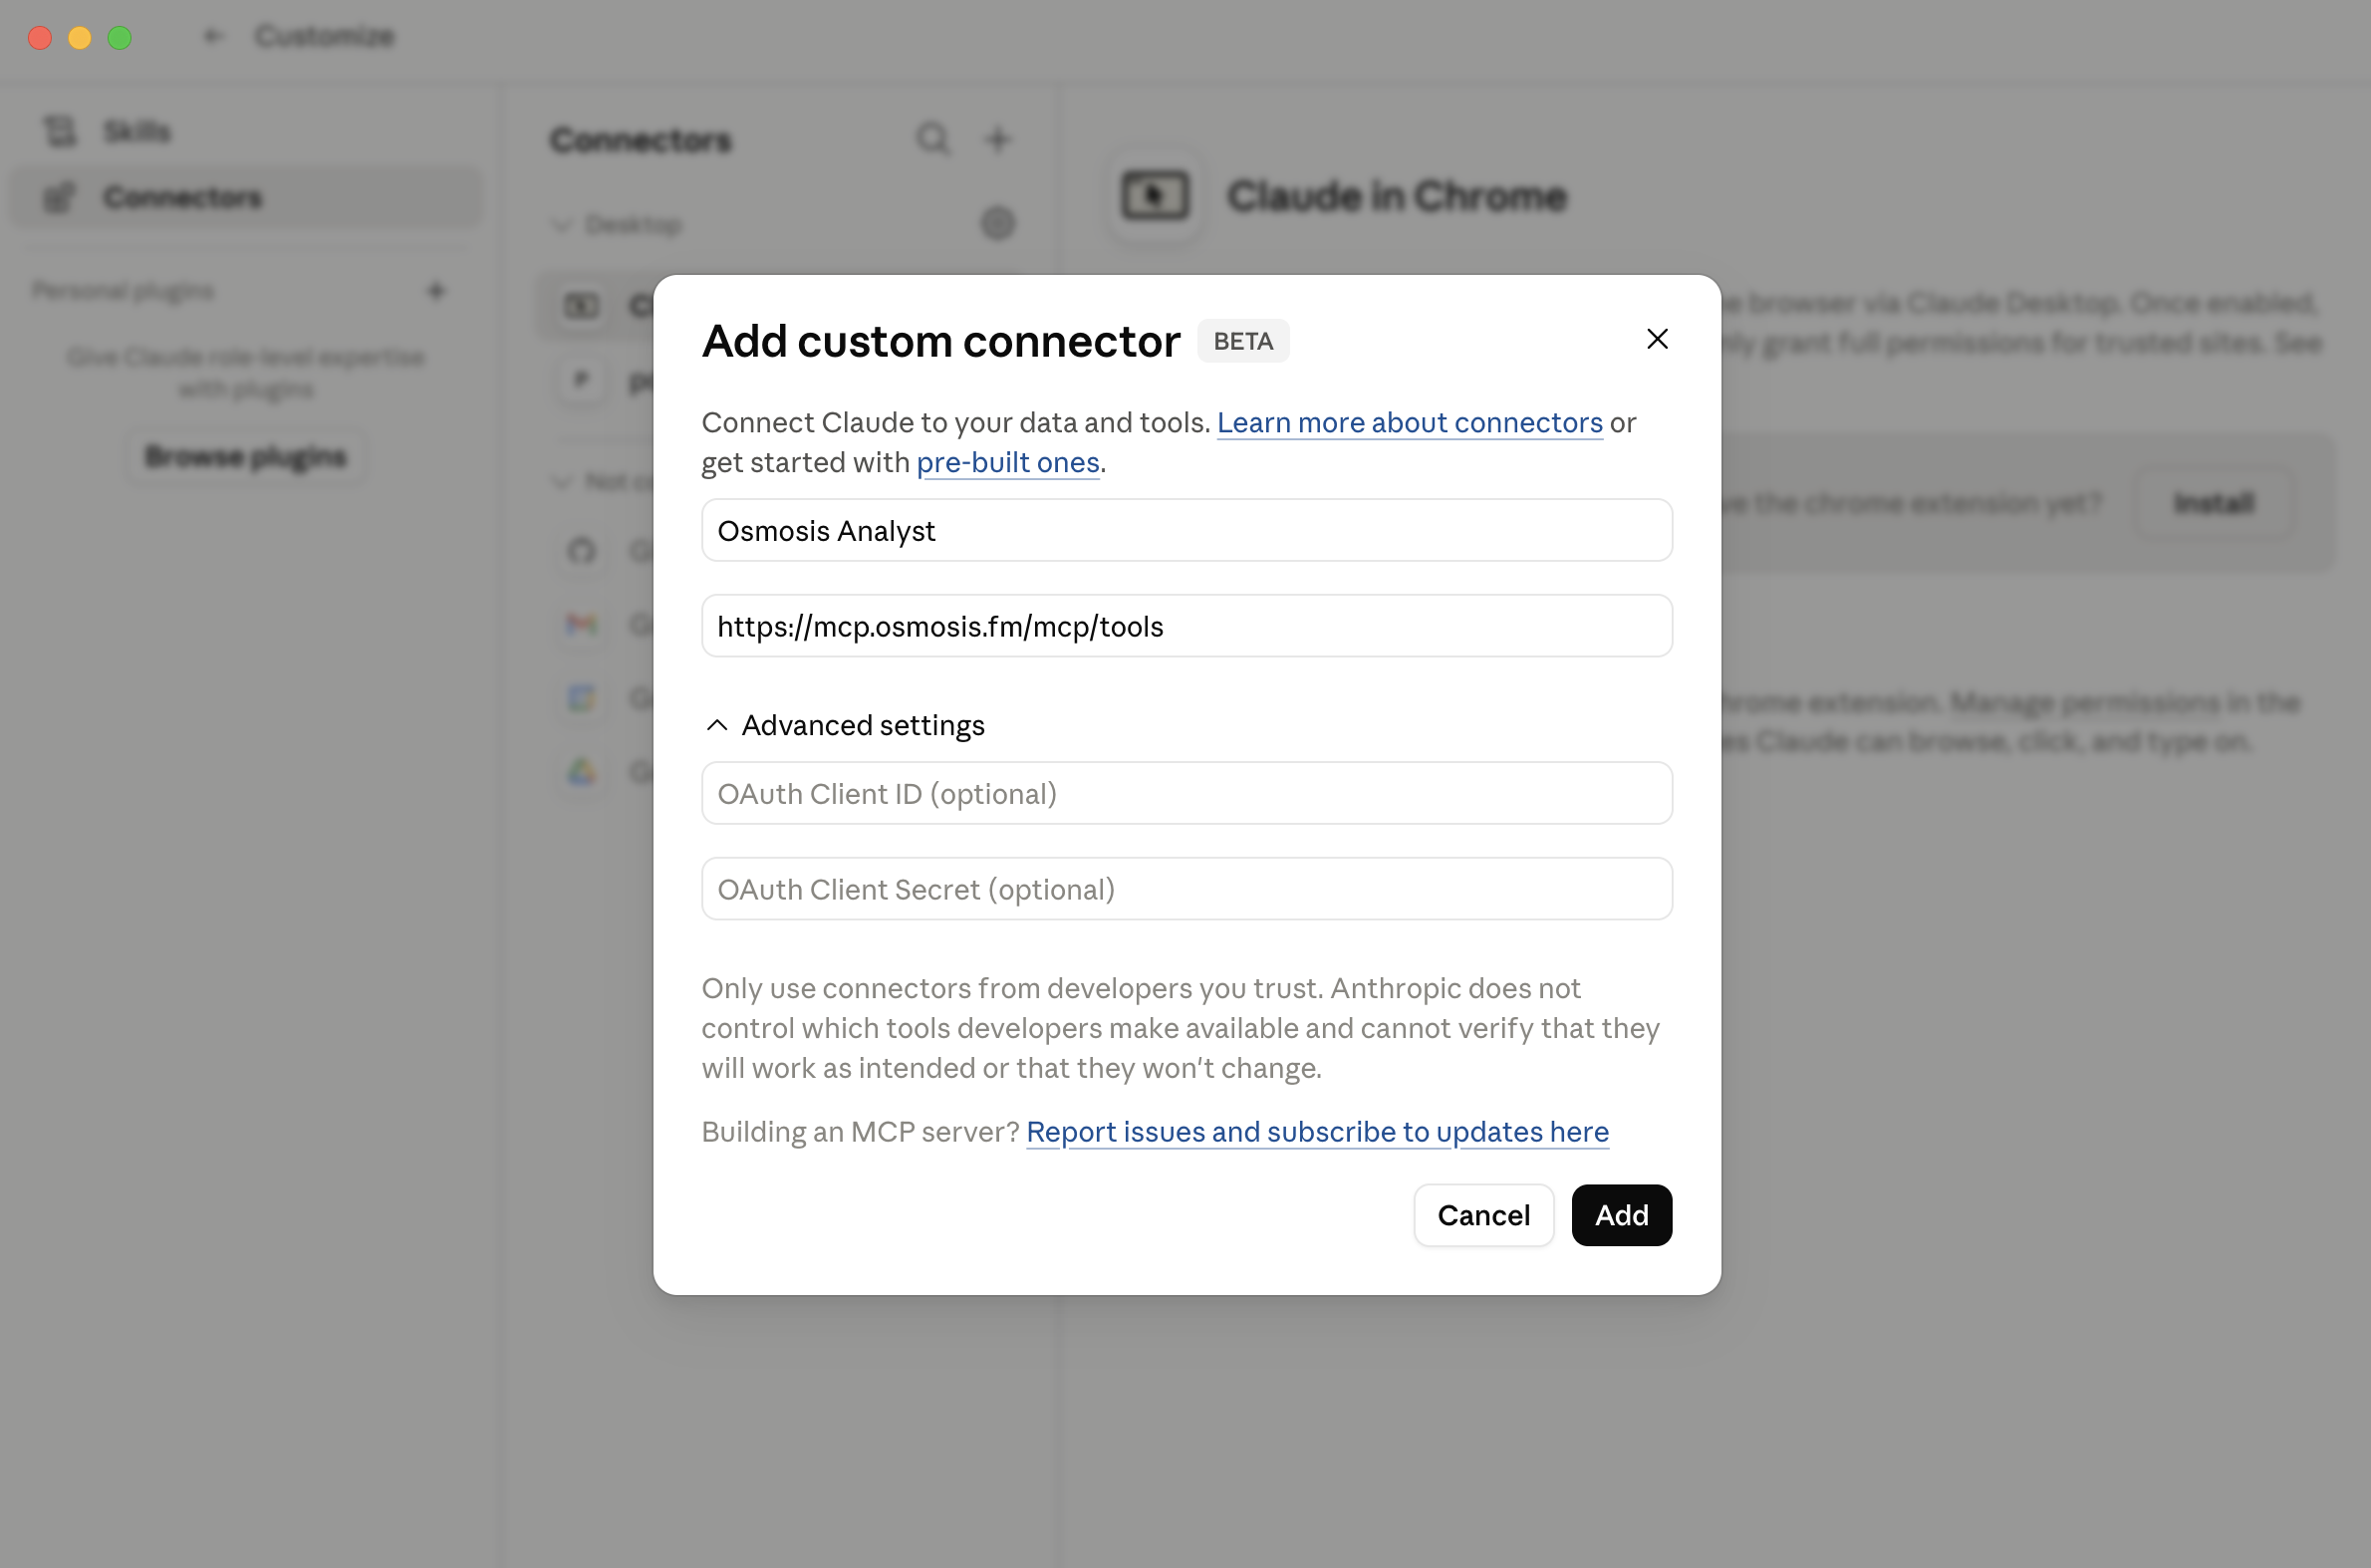
Click the + at the top of the Connectors list to open the Add custom connector dialog.
Enter the details
Name it Osmosis Analyst and paste the server URL https://mcp.osmosis.fm/mcp/tools (the path must be exact). Leave the Advanced settings OAuth fields blank, then click Add.
Connect and sign in
Click Connect on the new connector. Your browser opens the Osmosis sign-in page — sign in with your Osmosis email and password, or use Sign in with Google. Once you approve, the connector shows as connected.
2. Authorize the tools
Each tool the Analyst exposes needs your permission before Claude can use it. In Customize → Connectors, select Osmosis Analyst to open its Tool permissions. Set the dropdown to Always allow so Claude can query Osmosis without confirming every call — or set each tool individually to allow, ask each time, or deny.
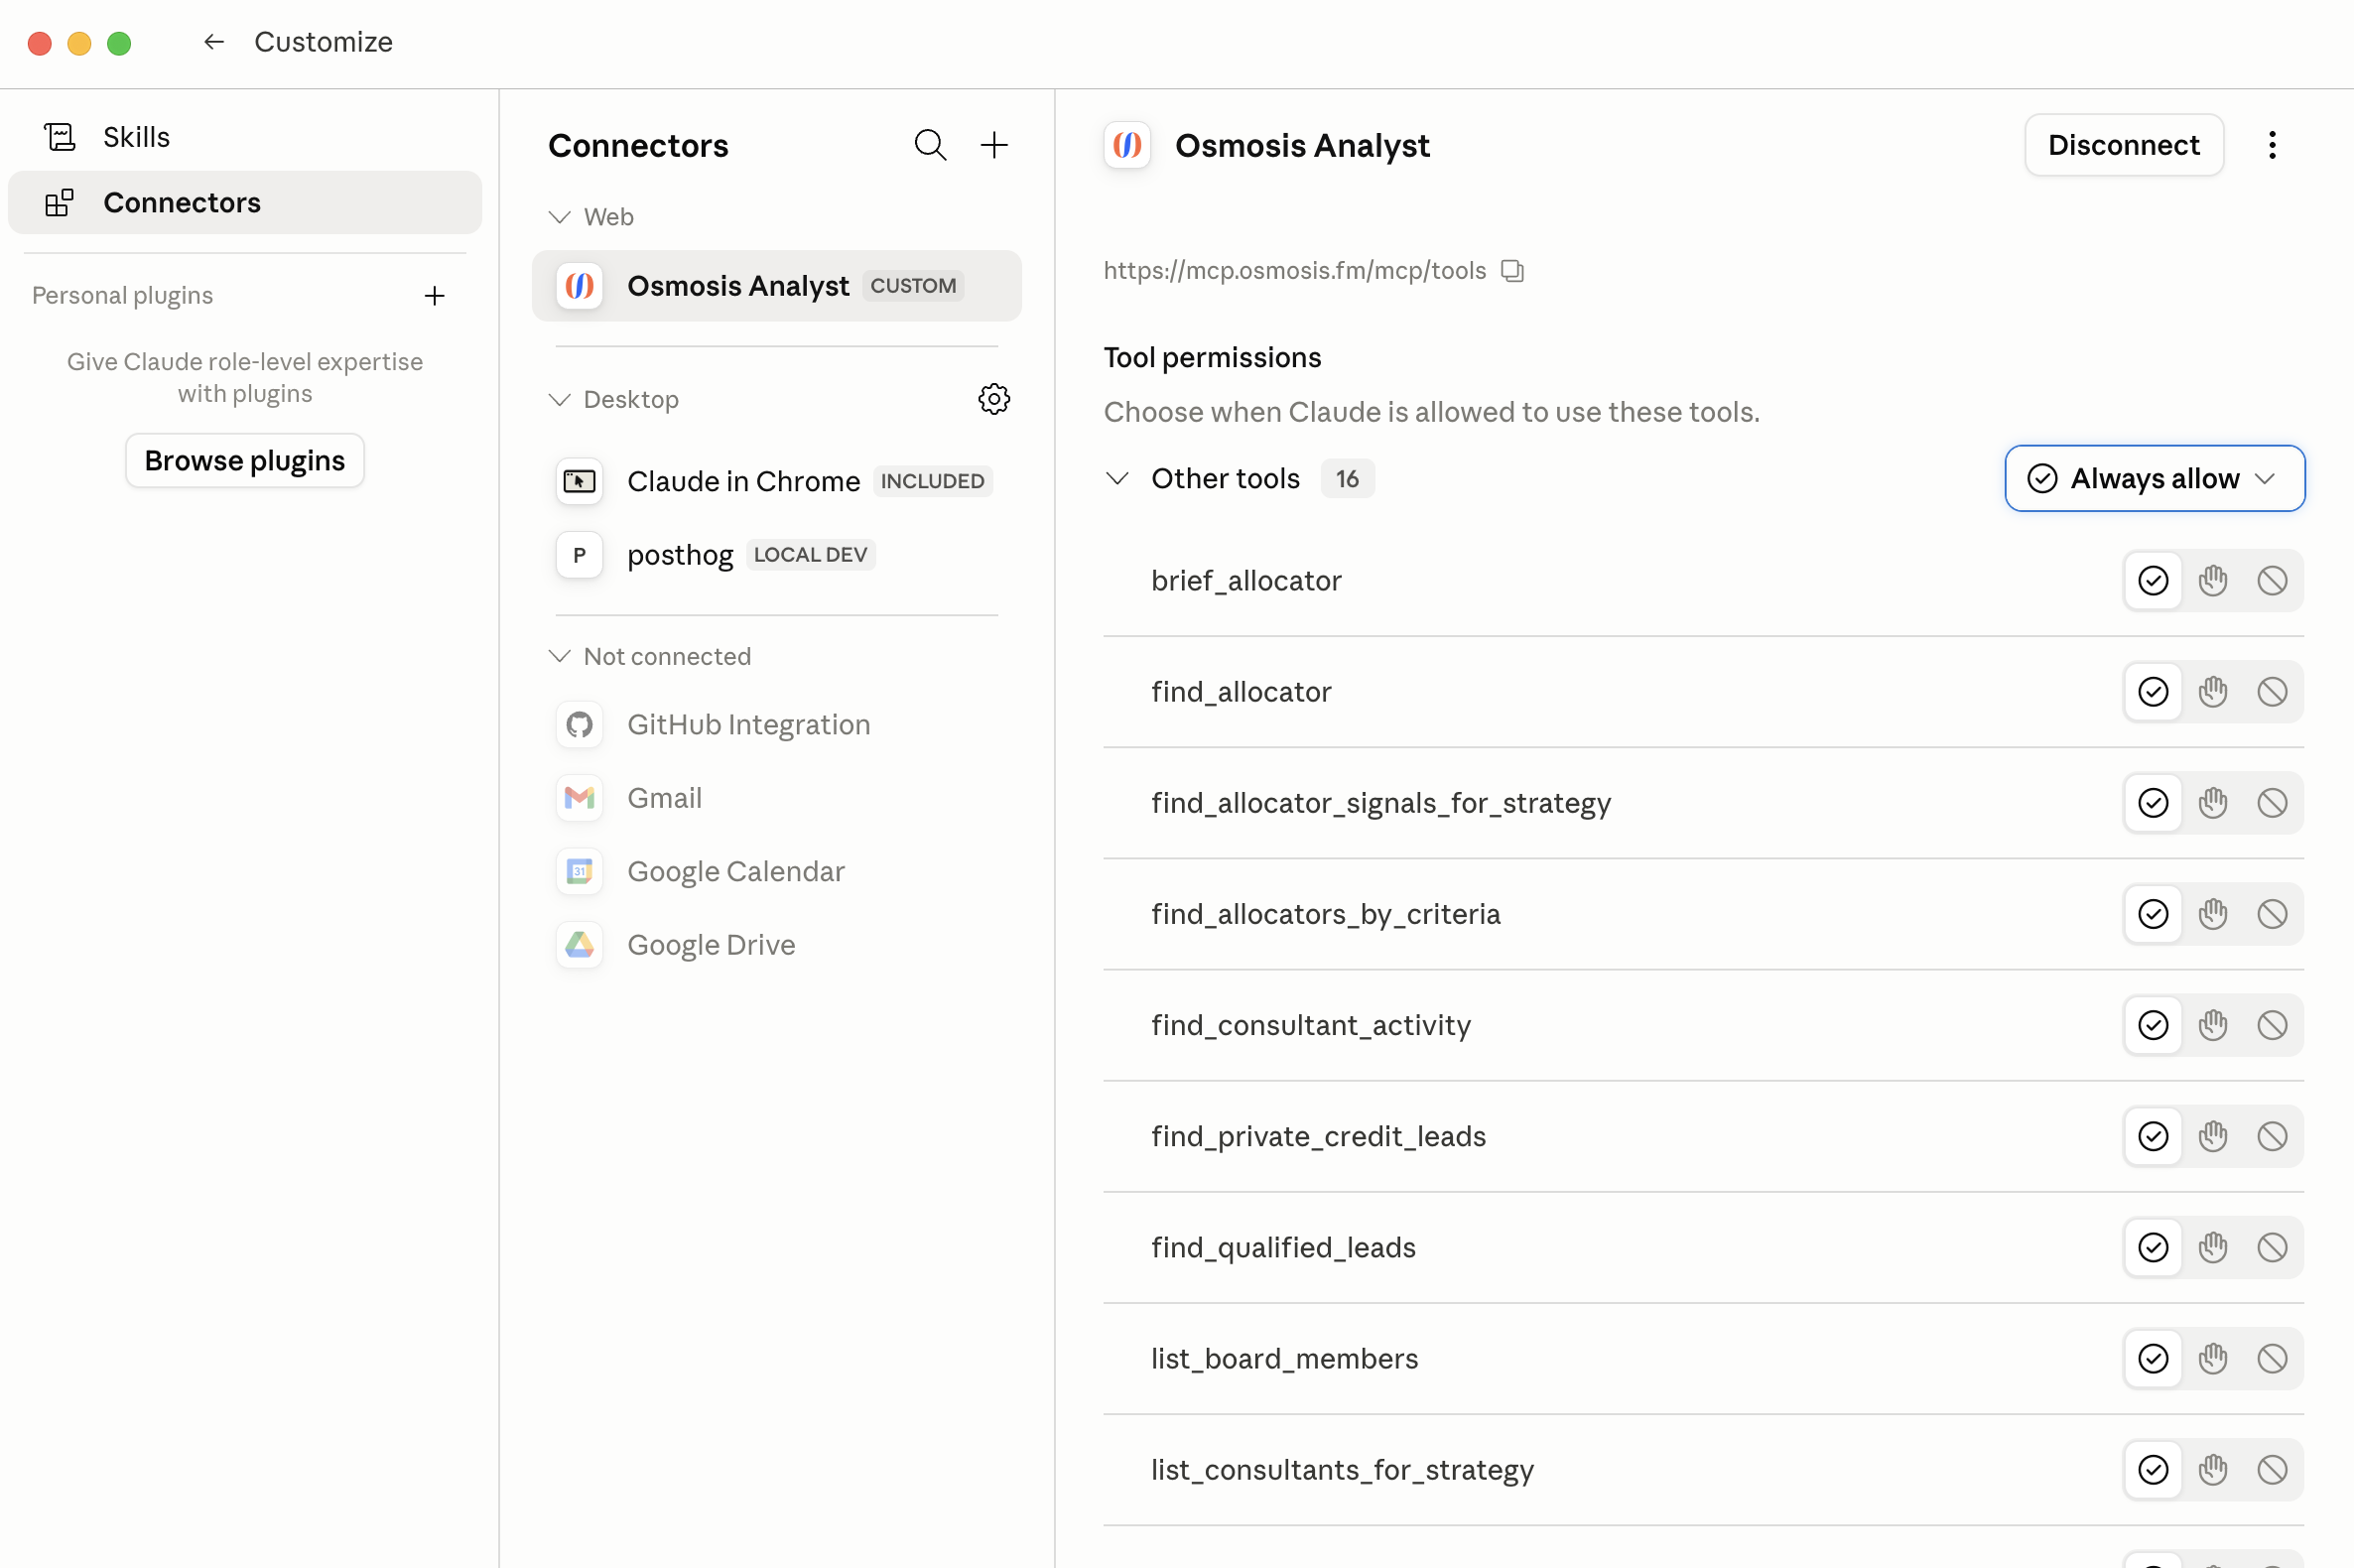
**Team and Enterprise Owners:** you can set the Analyst’s tool permissions once for the whole organization. Go to **Customize → Connectors**, select the **Osmosis Analyst**, and set each permission category — or individual tool — to **Always allow**, **Needs approval**, or **Blocked**. This determines whether your members see an approval prompt on every call, and it applies in Claude Code as well as Claude Desktop.
3. Use it in a chat
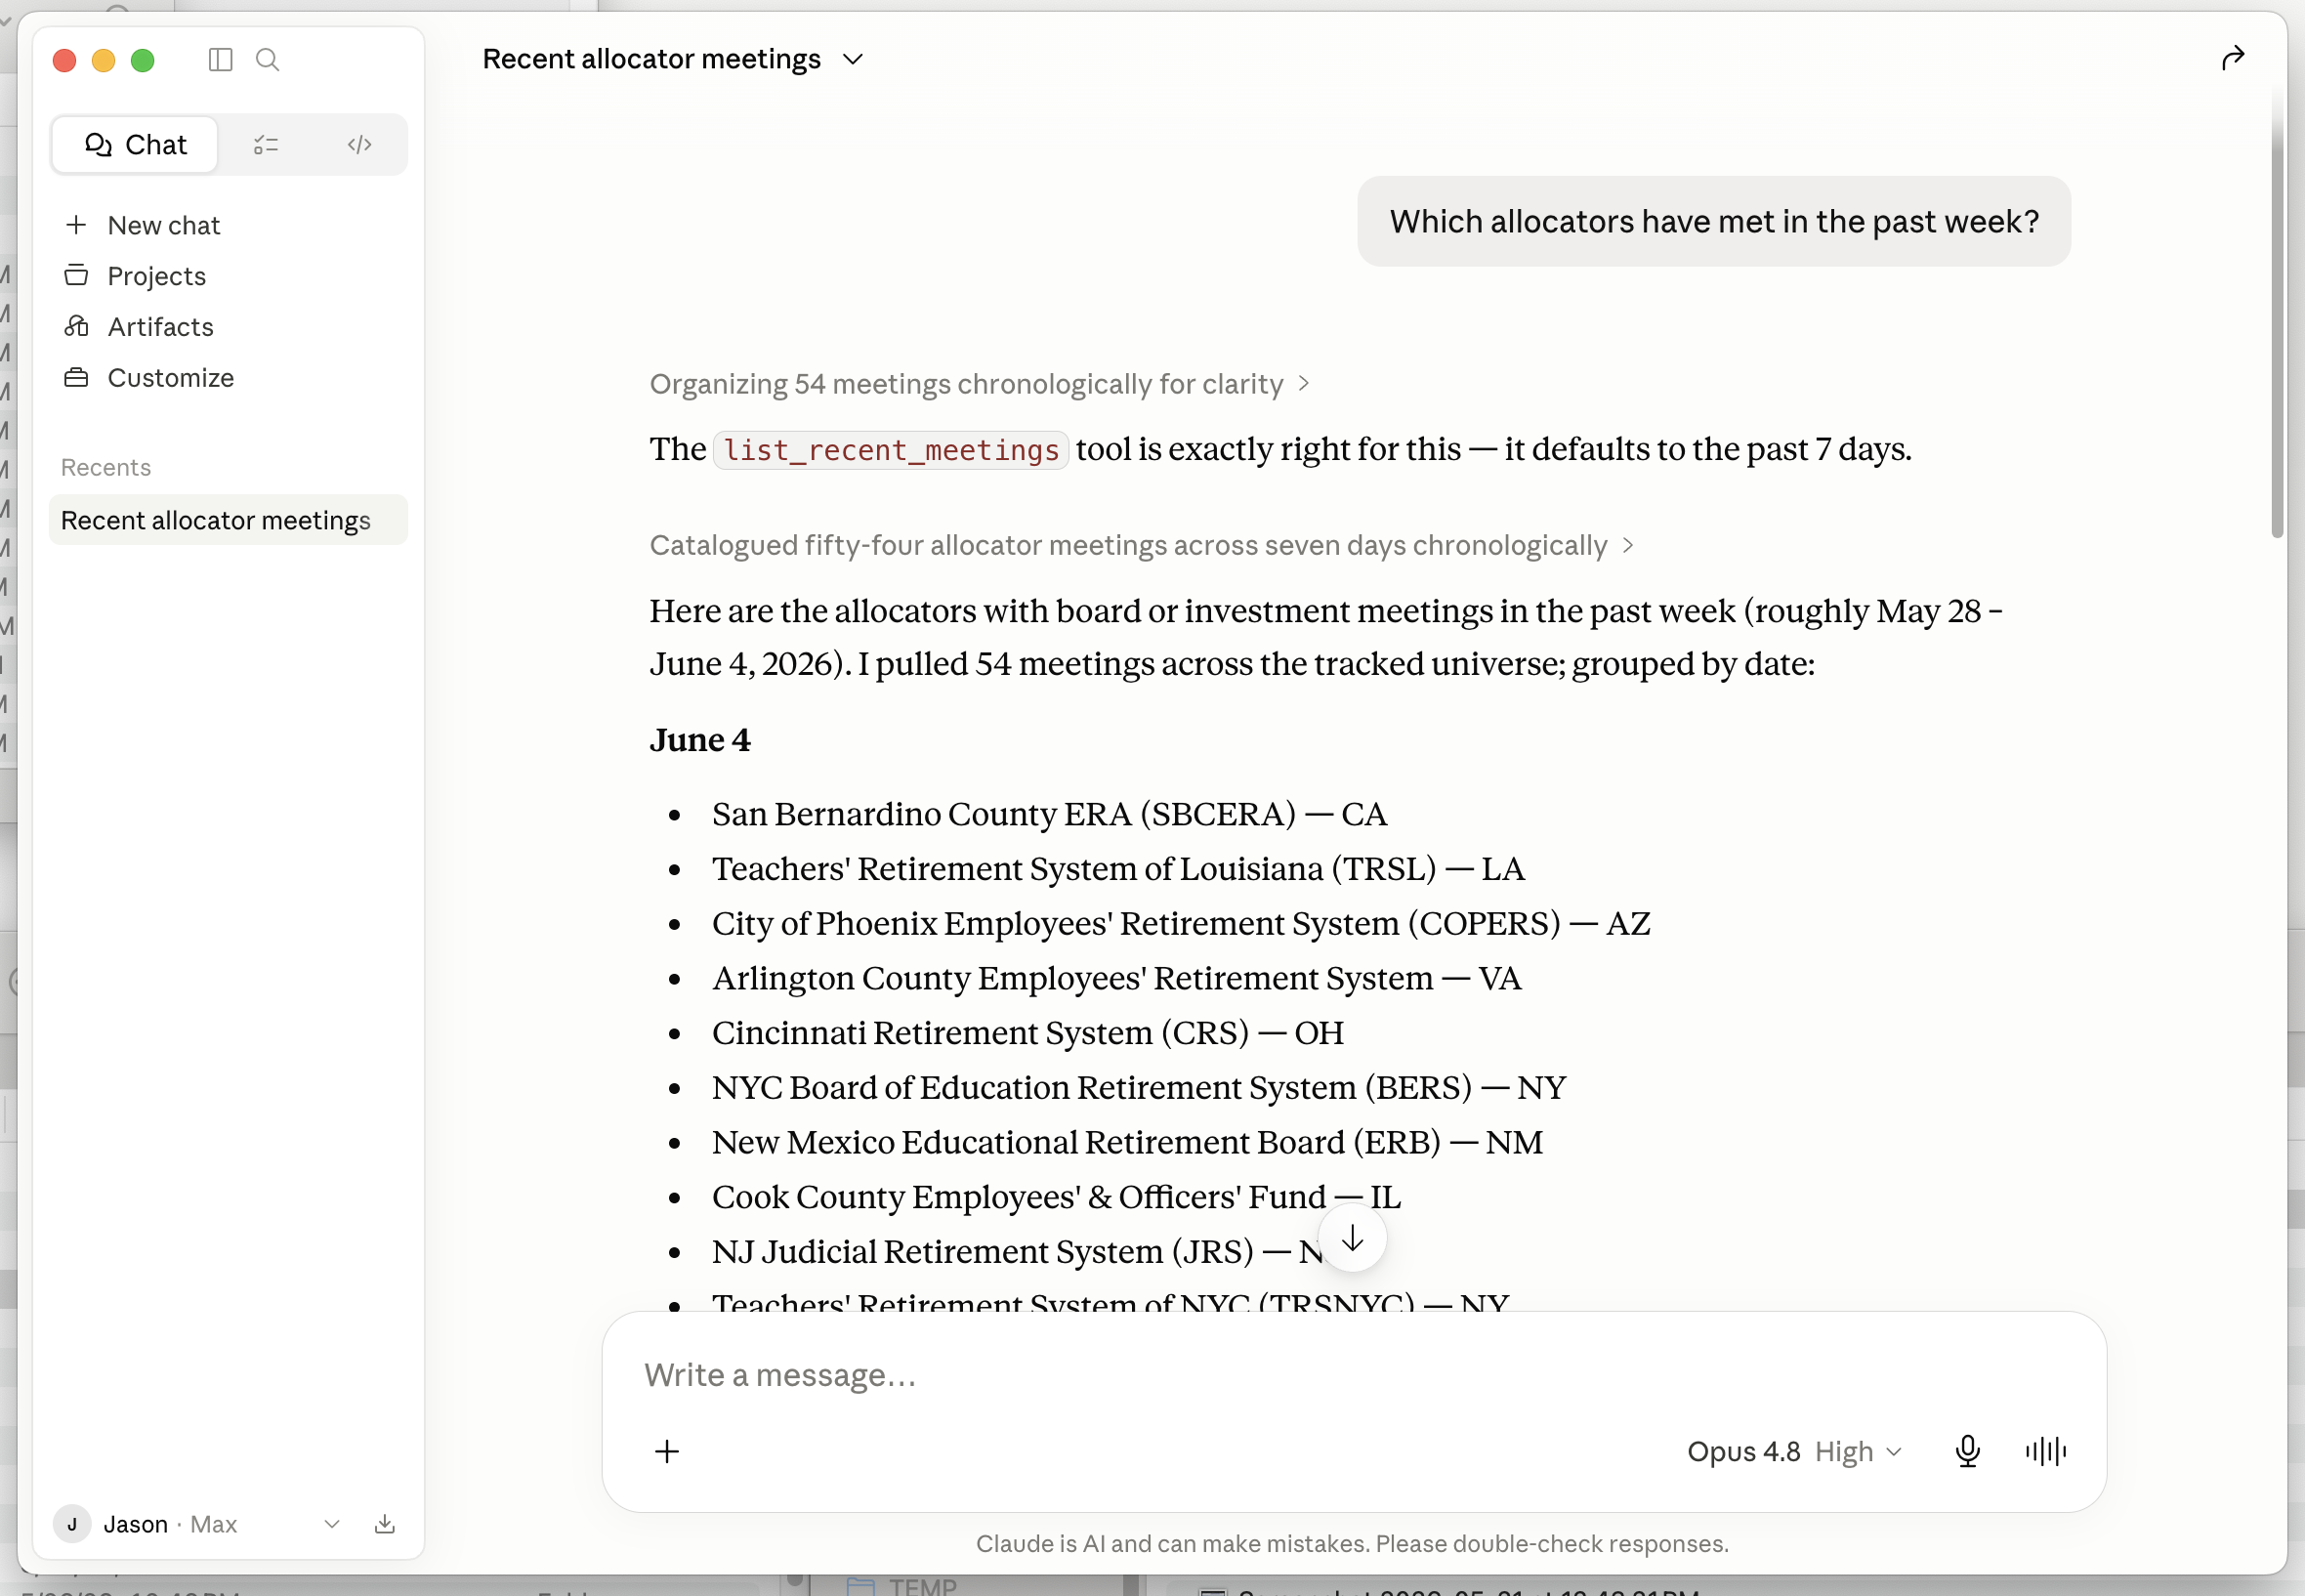
That’s it — Claude calls the Analyst automatically when a question needs allocator data. To confirm it’s active in a chat, open the search and tools menu in the message box and check that Osmosis Analyst is toggled on. Ask in plain language — see Example prompts.
Alternative: Claude Code
If you work in the terminal, Claude Code reaches the same server. In most cases there’s nothing to install. If you’re signed in to Claude Code with your Claude account, the connectors you’ve already added on claude.ai — including any your organization’s Owner added for everyone — are available in Claude Code automatically.
Make sure the connector exists in claude.ai
Add the Osmosis Analyst as a custom connector by following the steps above, or confirm your organization’s Owner has already added it for your workspace.
Run /mcp in Claude Code
Type /mcp. The Osmosis Analyst appears in the list marked as coming from claude.ai. If it needs sign-in, select it and choose Authenticate. Connectors you’ve never signed in to may be tucked behind a Show unused connectors row at the end of the claude.ai section.
If your organization provides the Osmosis Analyst as a connector, **don’t also add it with `claude mcp add`.** A server you add in Claude Code takes precedence over a claude.ai connector pointing at the same URL — `/mcp` then lists the org connector as **hidden**, and your local copy sidesteps any tool permissions your Owner set org-wide.
Only if you’re an individual user with no organization connector, register the server yourself. Use --scope user so it’s available across all your projects, then run /mcp, select osmosis-tools, and choose Authenticate to sign in through your browser.
claude mcp add --transport http --scope user osmosis-tools https://mcp.osmosis.fm/mcp/toolsclaude.ai connectors load only when your active authentication is a Claude account subscription login. They aren’t loaded when `ANTHROPIC_API_KEY`, `ANTHROPIC_AUTH_TOKEN`, `apiKeyHelper`, or a third-party provider such as Amazon Bedrock or Google Cloud is the active auth method — even if you ran `/login` earlier. Run `/status` to check which method is active.
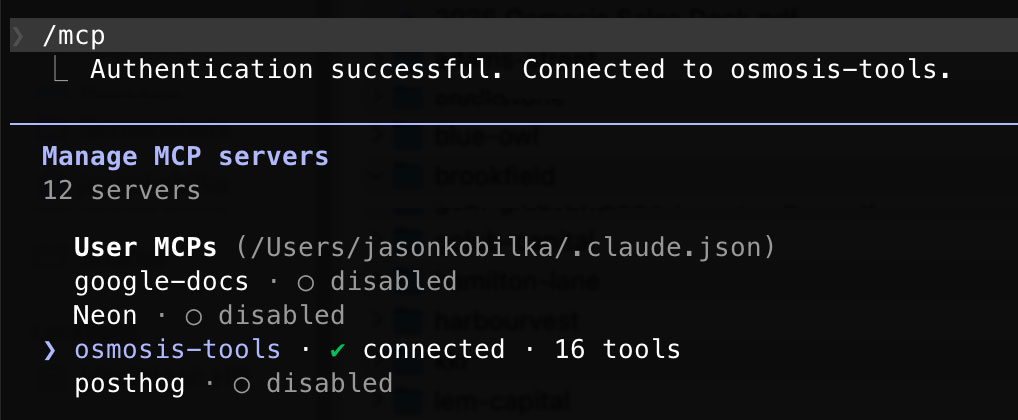
Run /mcp at any time to see the Analyst’s connection status and which permission applies to each of its tools. If you registered the server yourself, claude mcp list also shows it, and its tools appear as mcp__osmosis-tools__find_allocator, mcp__osmosis-tools__brief_allocator, and so on.
Connect with Claude Desktop (Recommended)
The easiest way to connect is through Claude Desktop — no command line required. You add the Analyst as a custom connector from the Customize menu, sign in once, and it’s available in every chat. The same steps work on claude.ai in the browser.
Custom connectors using remote MCP are available on the Free, Pro, Max, Team, and Enterprise plans. On the Free plan you can configure only one custom connector. On Team and Enterprise plans, only an Owner can add a custom connector — once they do, you connect and sign in yourself.
1. Add the Osmosis connector
Open the Customize menu
In Claude Desktop, open Customize and select Connectors.
Add a custom connector
Click the + at the top of the Connectors list to open the Add custom connector dialog.
Enter the details
Name it Osmosis Analyst and paste the server URL https://mcp.osmosis.fm/mcp/tools (the path must be exact). Leave the Advanced settings OAuth fields blank, then click Add.
Connect and sign in
Click Connect on the new connector. Your browser opens the Osmosis sign-in page — sign in with your Osmosis email and password, or use Sign in with Google. Once you approve, the connector shows as connected.
2. Authorize the tools
Each tool the Analyst exposes needs your permission before Claude can use it. In Customize → Connectors, select Osmosis Analyst to open its Tool permissions. Set the dropdown to Always allow so Claude can query Osmosis without confirming every call — or set each tool individually to allow, ask each time, or deny.
**Team and Enterprise Owners:** you can set the Analyst’s tool permissions once for the whole organization. Go to **Customize → Connectors**, select the **Osmosis Analyst**, and set each permission category — or individual tool — to **Always allow**, **Needs approval**, or **Blocked**. This determines whether your members see an approval prompt on every call, and it applies in Claude Code as well as Claude Desktop.
3. Use it in a chat
That’s it — Claude calls the Analyst automatically when a question needs allocator data. To confirm it’s active in a chat, open the search and tools menu in the message box and check that Osmosis Analyst is toggled on. Ask in plain language — see Example prompts.
Alternative: Claude Code
If you work in the terminal, Claude Code reaches the same server. In most cases there’s nothing to install. If you’re signed in to Claude Code with your Claude account, the connectors you’ve already added on claude.ai — including any your organization’s Owner added for everyone — are available in Claude Code automatically.
Make sure the connector exists in claude.ai
Add the Osmosis Analyst as a custom connector by following the steps above, or confirm your organization’s Owner has already added it for your workspace.
Run /mcp in Claude Code
Type /mcp. The Osmosis Analyst appears in the list marked as coming from claude.ai. If it needs sign-in, select it and choose Authenticate. Connectors you’ve never signed in to may be tucked behind a Show unused connectors row at the end of the claude.ai section.
If your organization provides the Osmosis Analyst as a connector, **don’t also add it with `claude mcp add`.** A server you add in Claude Code takes precedence over a claude.ai connector pointing at the same URL — `/mcp` then lists the org connector as **hidden**, and your local copy sidesteps any tool permissions your Owner set org-wide.
Only if you’re an individual user with no organization connector, register the server yourself. Use --scope user so it’s available across all your projects, then run /mcp, select osmosis-tools, and choose Authenticate to sign in through your browser.
claude mcp add --transport http --scope user osmosis-tools https://mcp.osmosis.fm/mcp/toolsclaude.ai connectors load only when your active authentication is a Claude account subscription login. They aren’t loaded when `ANTHROPIC_API_KEY`, `ANTHROPIC_AUTH_TOKEN`, `apiKeyHelper`, or a third-party provider such as Amazon Bedrock or Google Cloud is the active auth method — even if you ran `/login` earlier. Run `/status` to check which method is active.
Run /mcp at any time to see the Analyst’s connection status and which permission applies to each of its tools. If you registered the server yourself, claude mcp list also shows it, and its tools appear as mcp__osmosis-tools__find_allocator, mcp__osmosis-tools__brief_allocator, and so on.
Connect with ChatGPT
Custom MCP connectors require ChatGPT Developer Mode, available on Plus, Pro, Business, Enterprise, and Edu plans (not Free) and only in a web browser — not the mobile apps. On Business, Enterprise, and Edu, a workspace admin must enable it first. The feature is in beta.
ChatGPT calls MCP servers through its Apps feature (older accounts may still call it Connectors).
1. Turn on Developer Mode
Open Settings
On chatgpt.com, click your profile picture (top right) and open Settings.
Enable Developer Mode
Go to Apps (older accounts: Connectors), open Advanced settings, and switch Developer mode on. Accept the security notice.
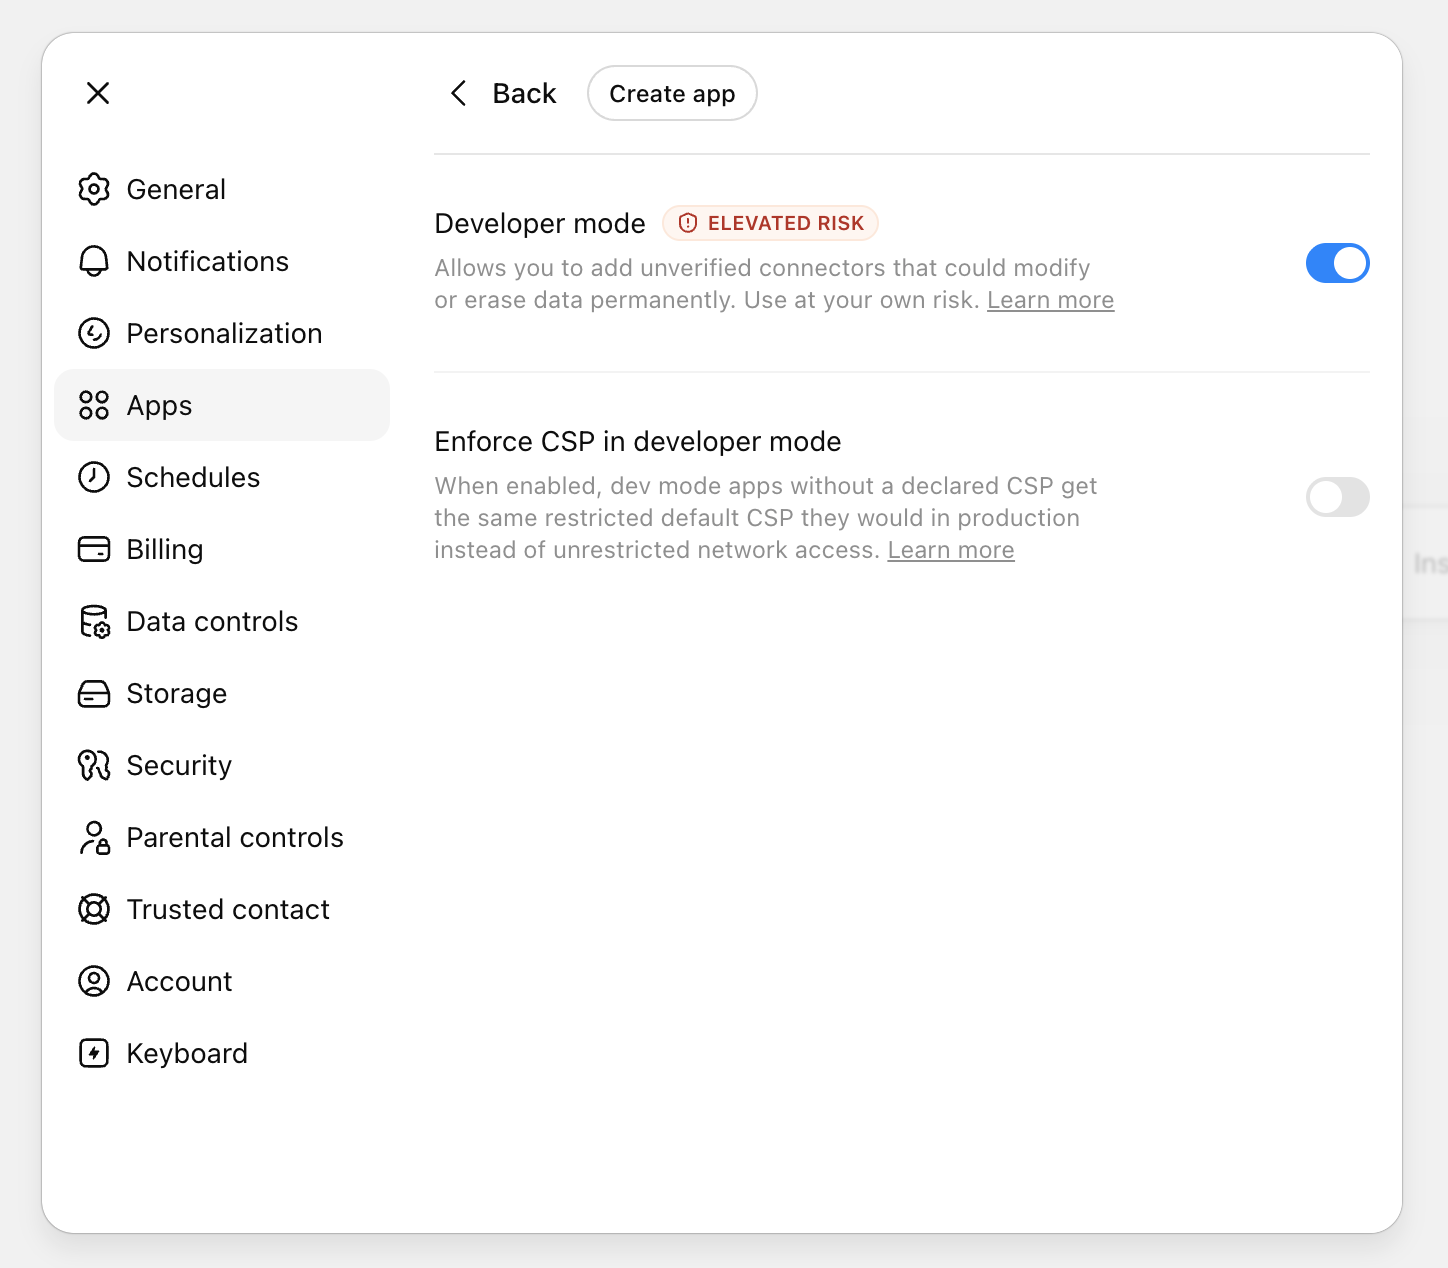
Turning on Developer Mode temporarily disables ChatGPT’s Memory feature. That’s an OpenAI security default, not an Osmosis setting.
2. Add the Osmosis connector
Create a custom connector
Back in Apps, click Add custom connector (or Create).
Enter the details
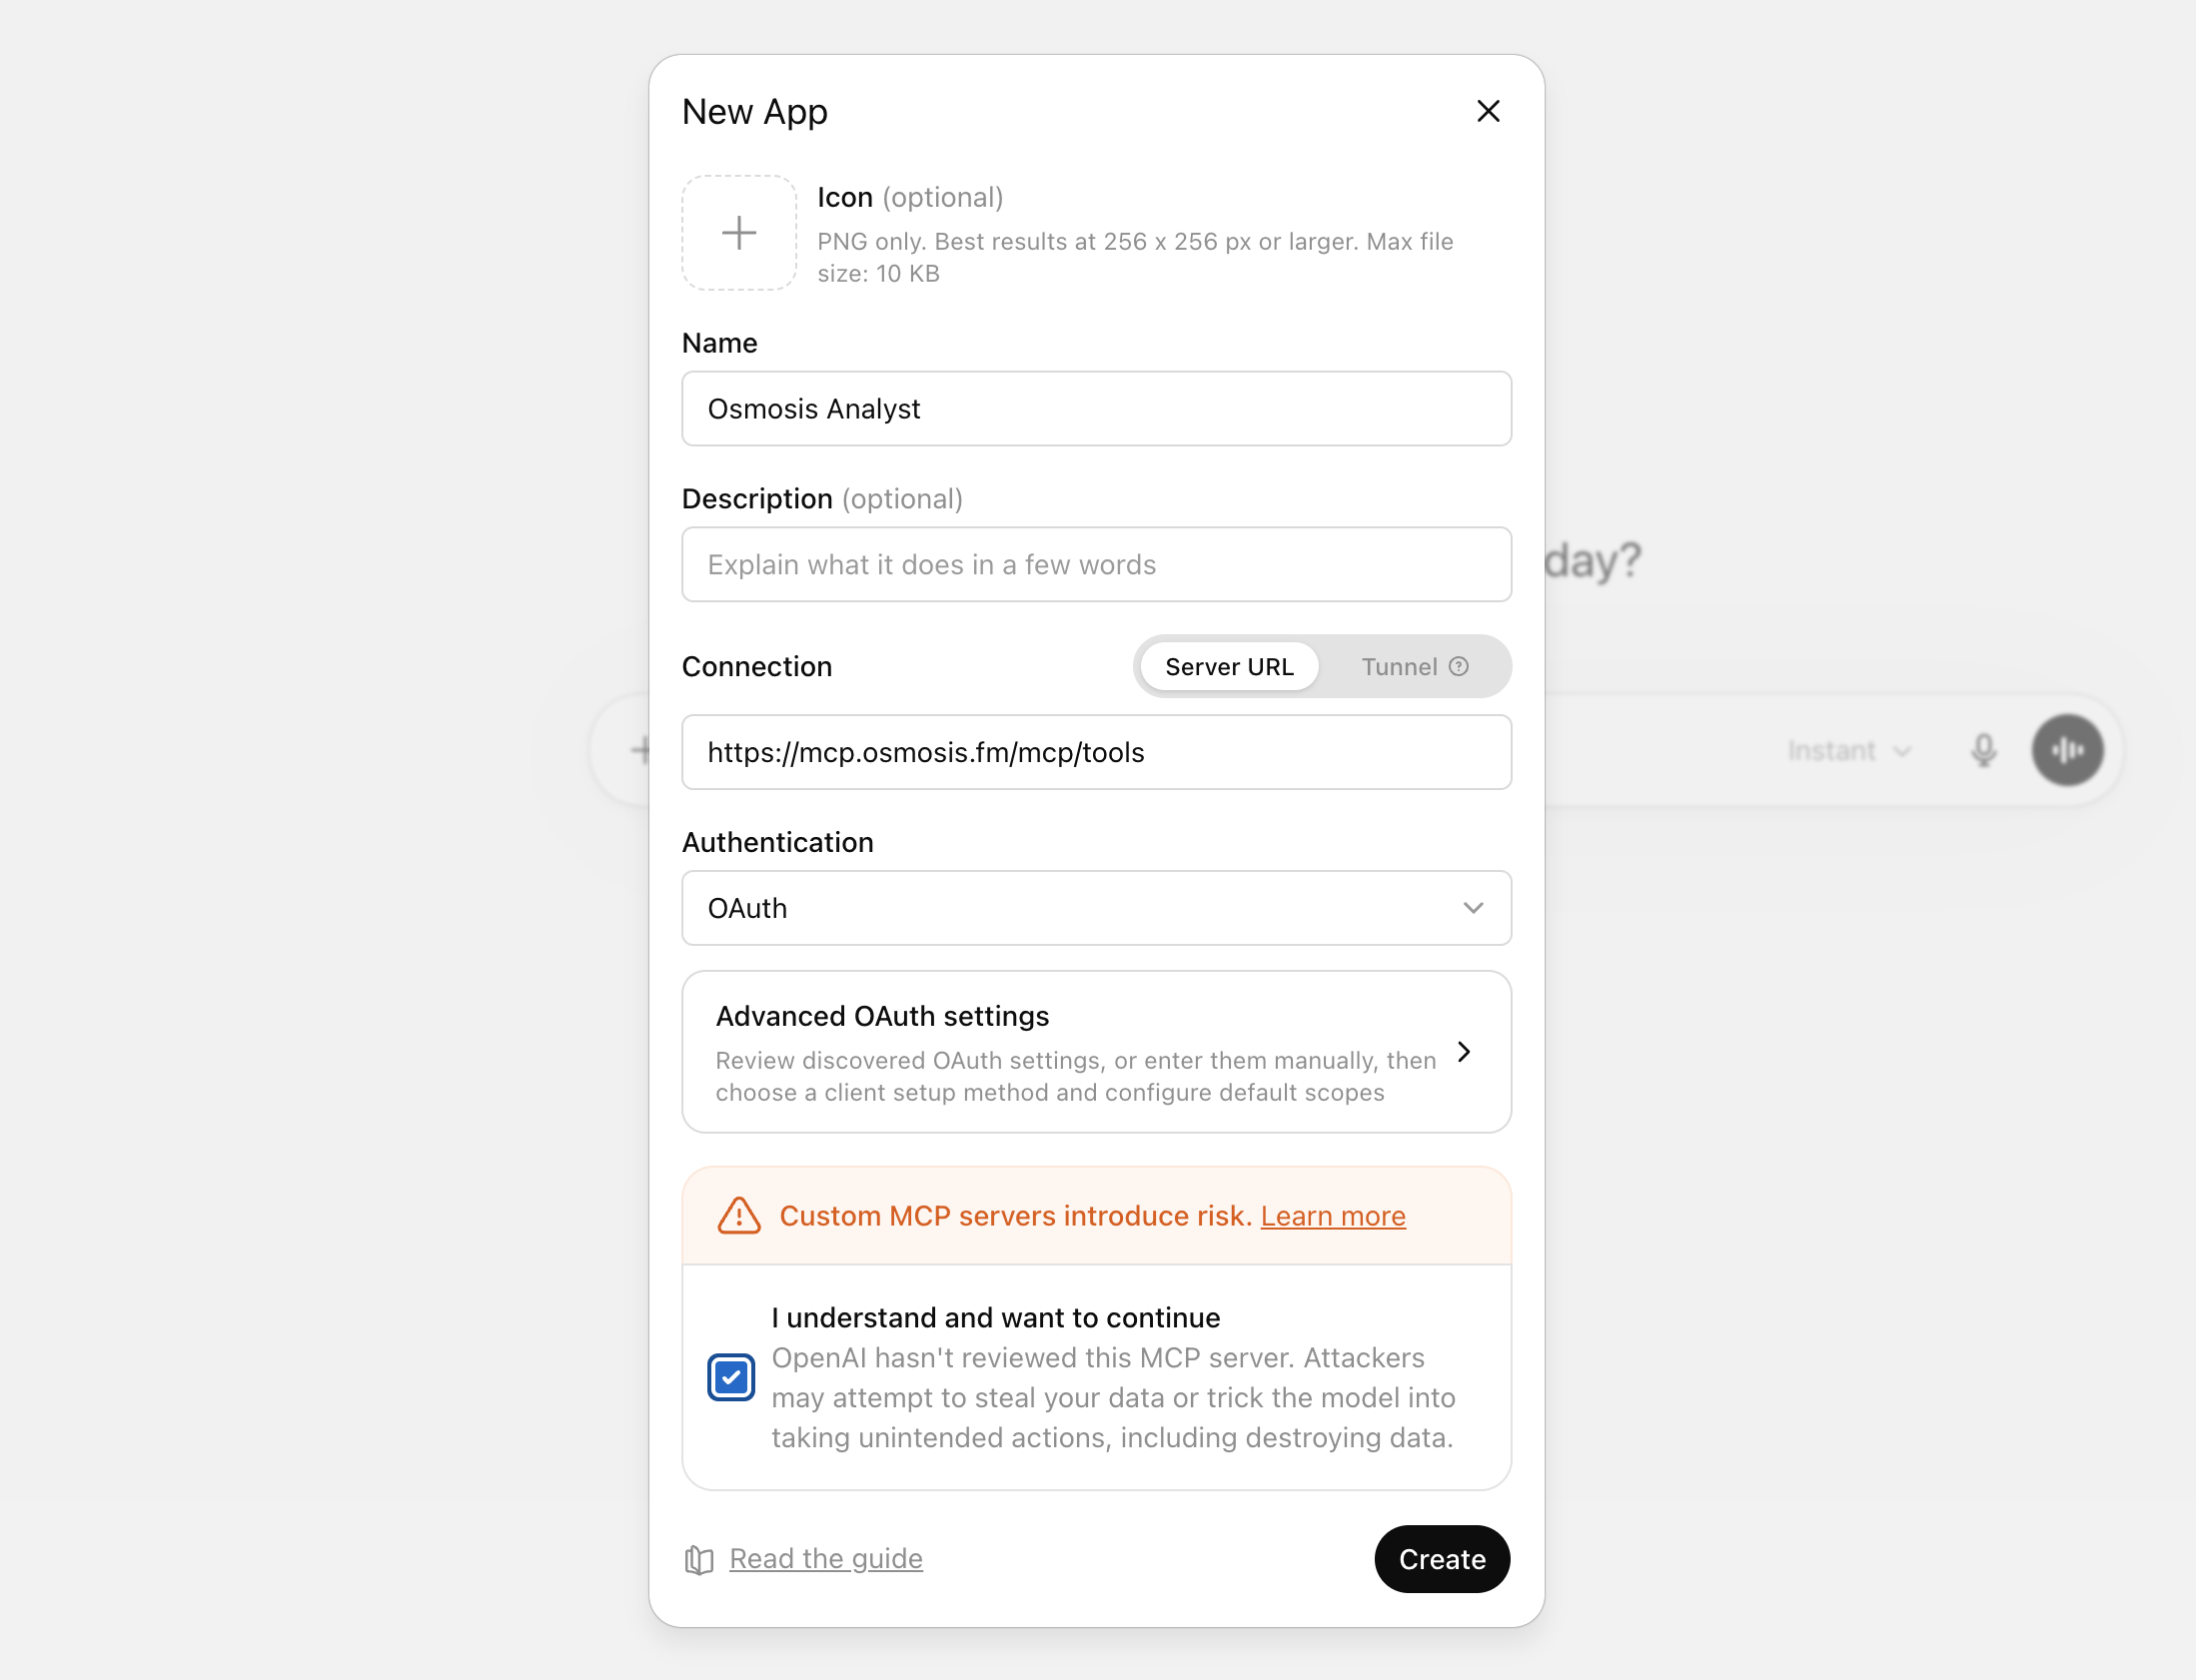
Name it Osmosis Analyst, paste the MCP server URL https://mcp.osmosis.fm/mcp/tools (the path must be exact), and set Authentication to OAuth.
Authorize
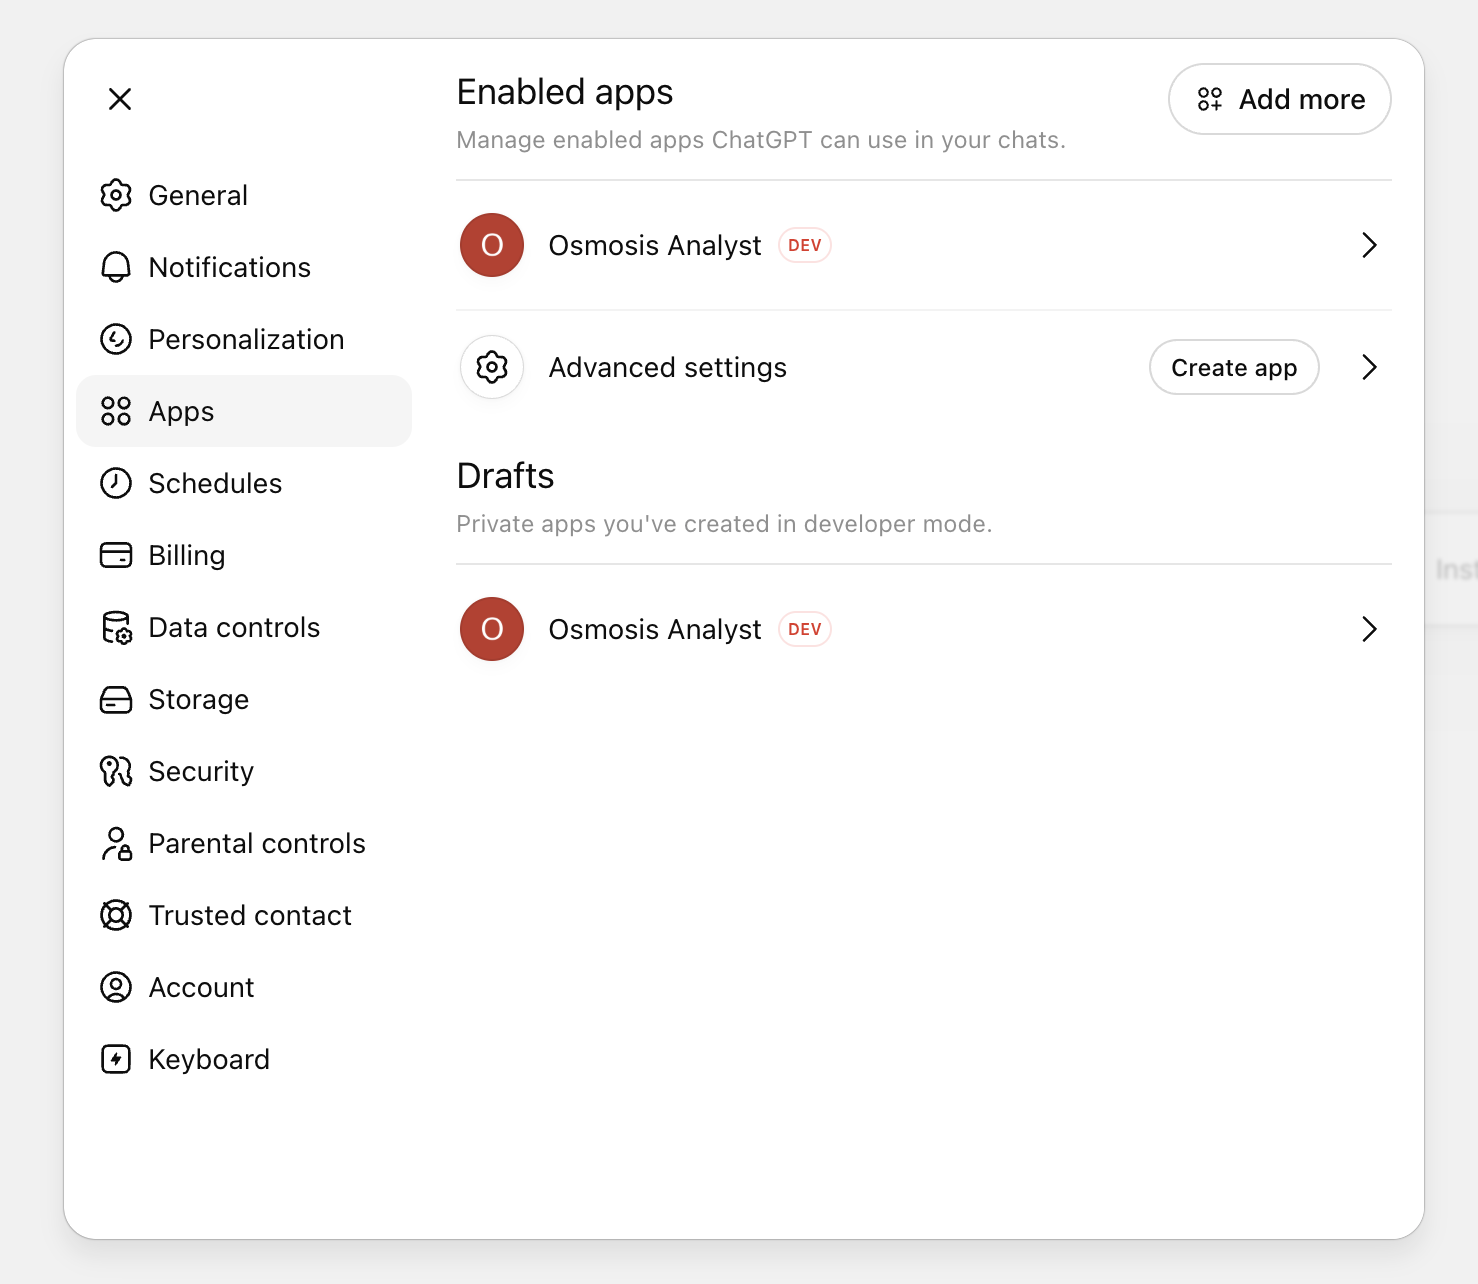
Confirm you trust the app and click Create. A window opens to the Osmosis sign-in page — sign in to finish connecting. (If nothing happens, allow pop-ups from chatgpt.com and retry.)
3. Use it in a chat
Open the tools menu
In a chat, click the + in the message box, then More, then Developer mode.
Enable Osmosis
Toggle the Osmosis Analyst app on for this conversation. The input border turns orange to show it’s active.
You enable the connector per conversation — there’s no always-on setting. The Analyst’s tools work in normal chat but not in ChatGPT’s Deep Research mode, which only accepts search and fetch tools.
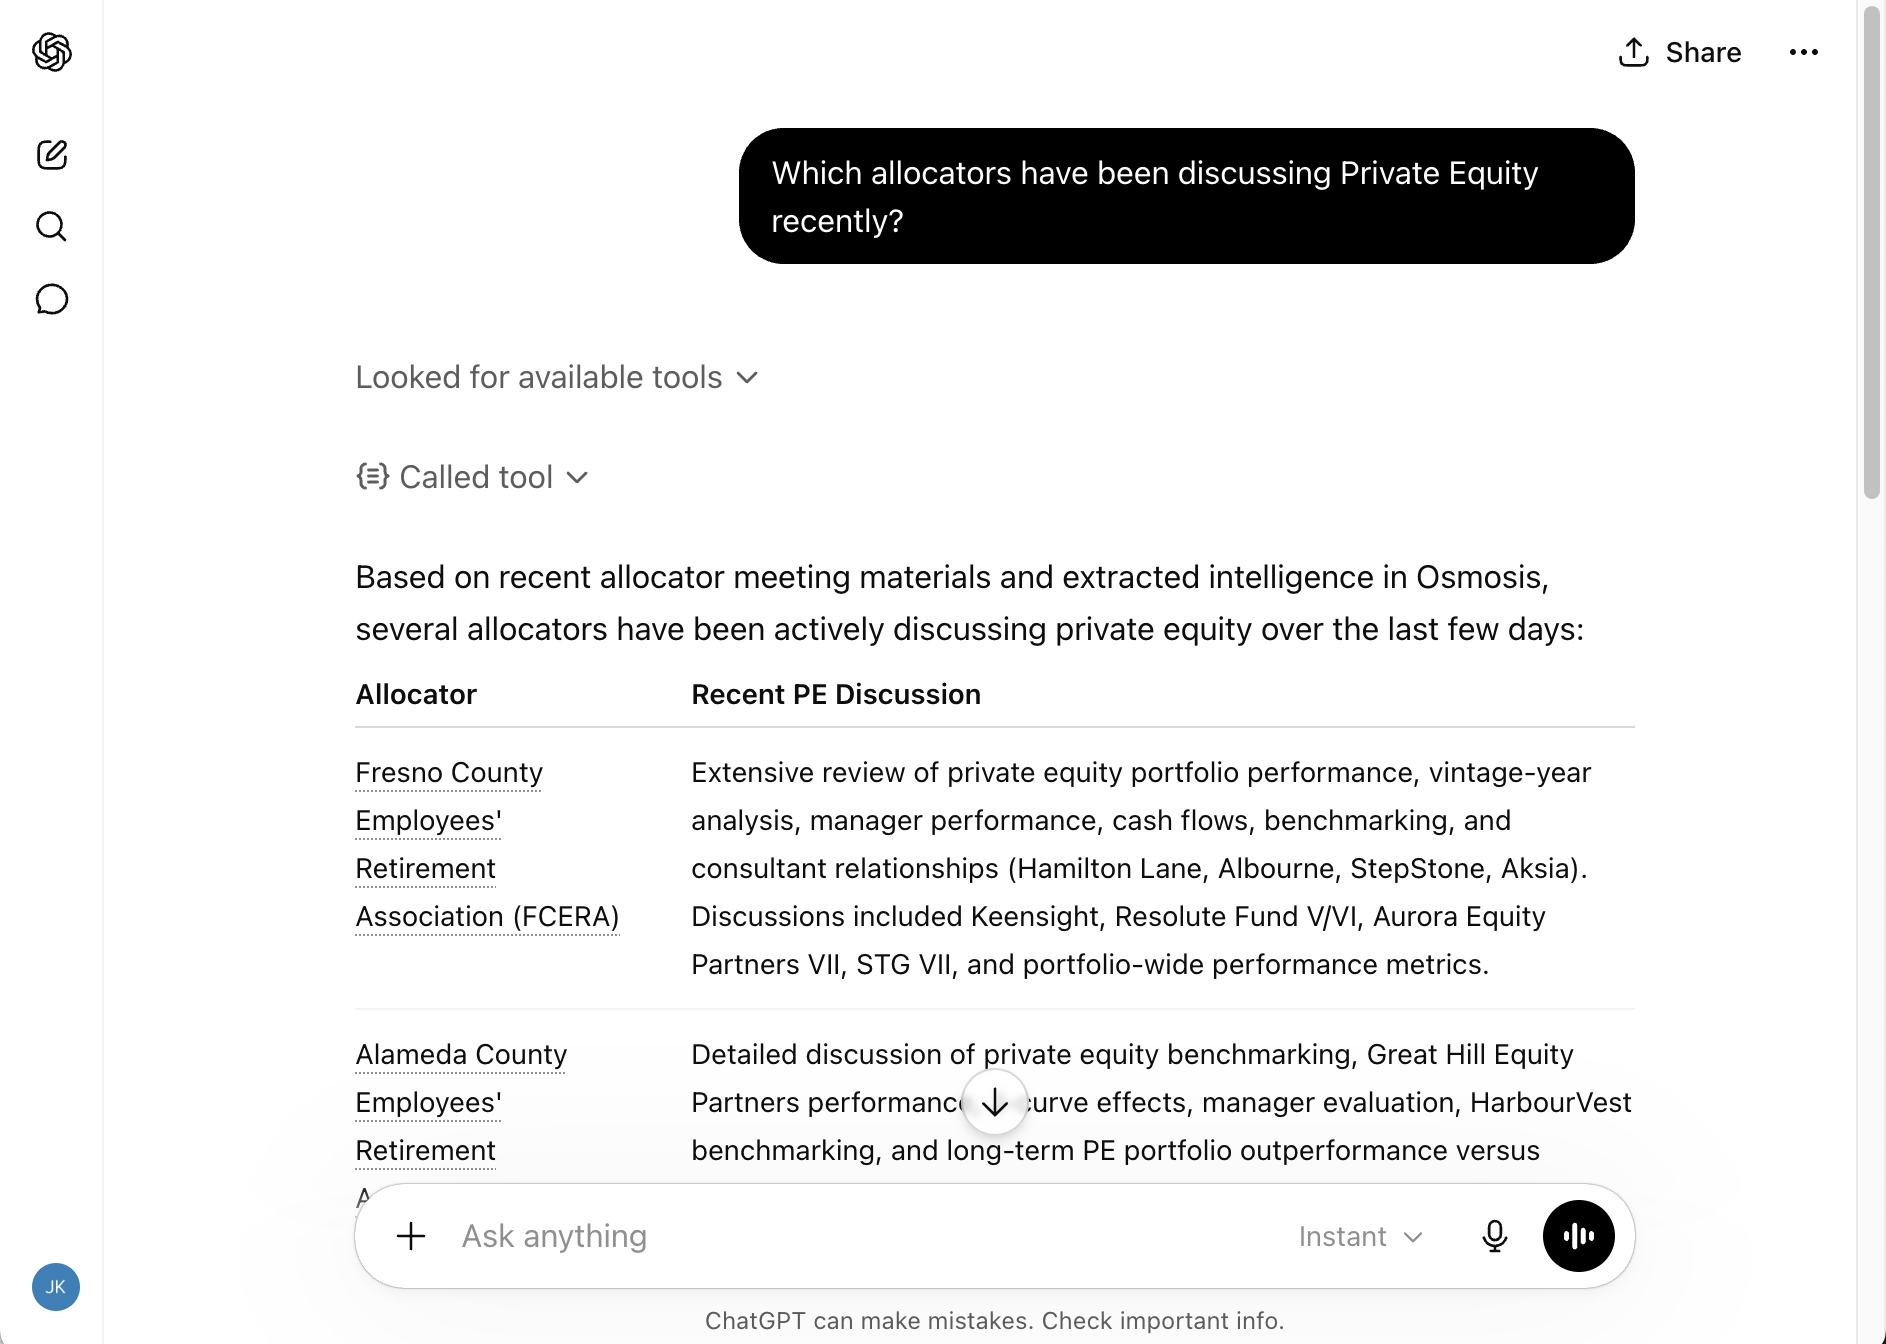
ChatGPT recently renamed Connectors to Apps — older accounts may still show the Connectors label.
Connect with ChatGPT
Custom MCP connectors require ChatGPT Developer Mode, available on Plus, Pro, Business, Enterprise, and Edu plans (not Free) and only in a web browser — not the mobile apps. On Business, Enterprise, and Edu, a workspace admin must enable it first. The feature is in beta.
ChatGPT calls MCP servers through its Apps feature (older accounts may still call it Connectors).
1. Turn on Developer Mode
Open Settings
On chatgpt.com, click your profile picture (top right) and open Settings.
Enable Developer Mode
Go to Apps (older accounts: Connectors), open Advanced settings, and switch Developer mode on. Accept the security notice.
Turning on Developer Mode temporarily disables ChatGPT’s Memory feature. That’s an OpenAI security default, not an Osmosis setting.
2. Add the Osmosis connector
Create a custom connector
Back in Apps, click Add custom connector (or Create).
Enter the details
Name it Osmosis Analyst, paste the MCP server URL https://mcp.osmosis.fm/mcp/tools (the path must be exact), and set Authentication to OAuth.
Authorize
Confirm you trust the app and click Create. A window opens to the Osmosis sign-in page — sign in to finish connecting. (If nothing happens, allow pop-ups from chatgpt.com and retry.)
3. Use it in a chat
Open the tools menu
In a chat, click the + in the message box, then More, then Developer mode.
Enable Osmosis
Toggle the Osmosis Analyst app on for this conversation. The input border turns orange to show it’s active.
You enable the connector per conversation — there’s no always-on setting. The Analyst’s tools work in normal chat but not in ChatGPT’s Deep Research mode, which only accepts search and fetch tools.
ChatGPT recently renamed Connectors to Apps — older accounts may still show the Connectors label.
Connect with Microsoft 365 Copilot
Using the Osmosis Analyst in Microsoft 365 Copilot requires Microsoft 365 Copilot access — a per-user license or pay-as-you-go — and your organization’s Microsoft 365 admin must add the Osmosis Analyst agent to your tenant first.
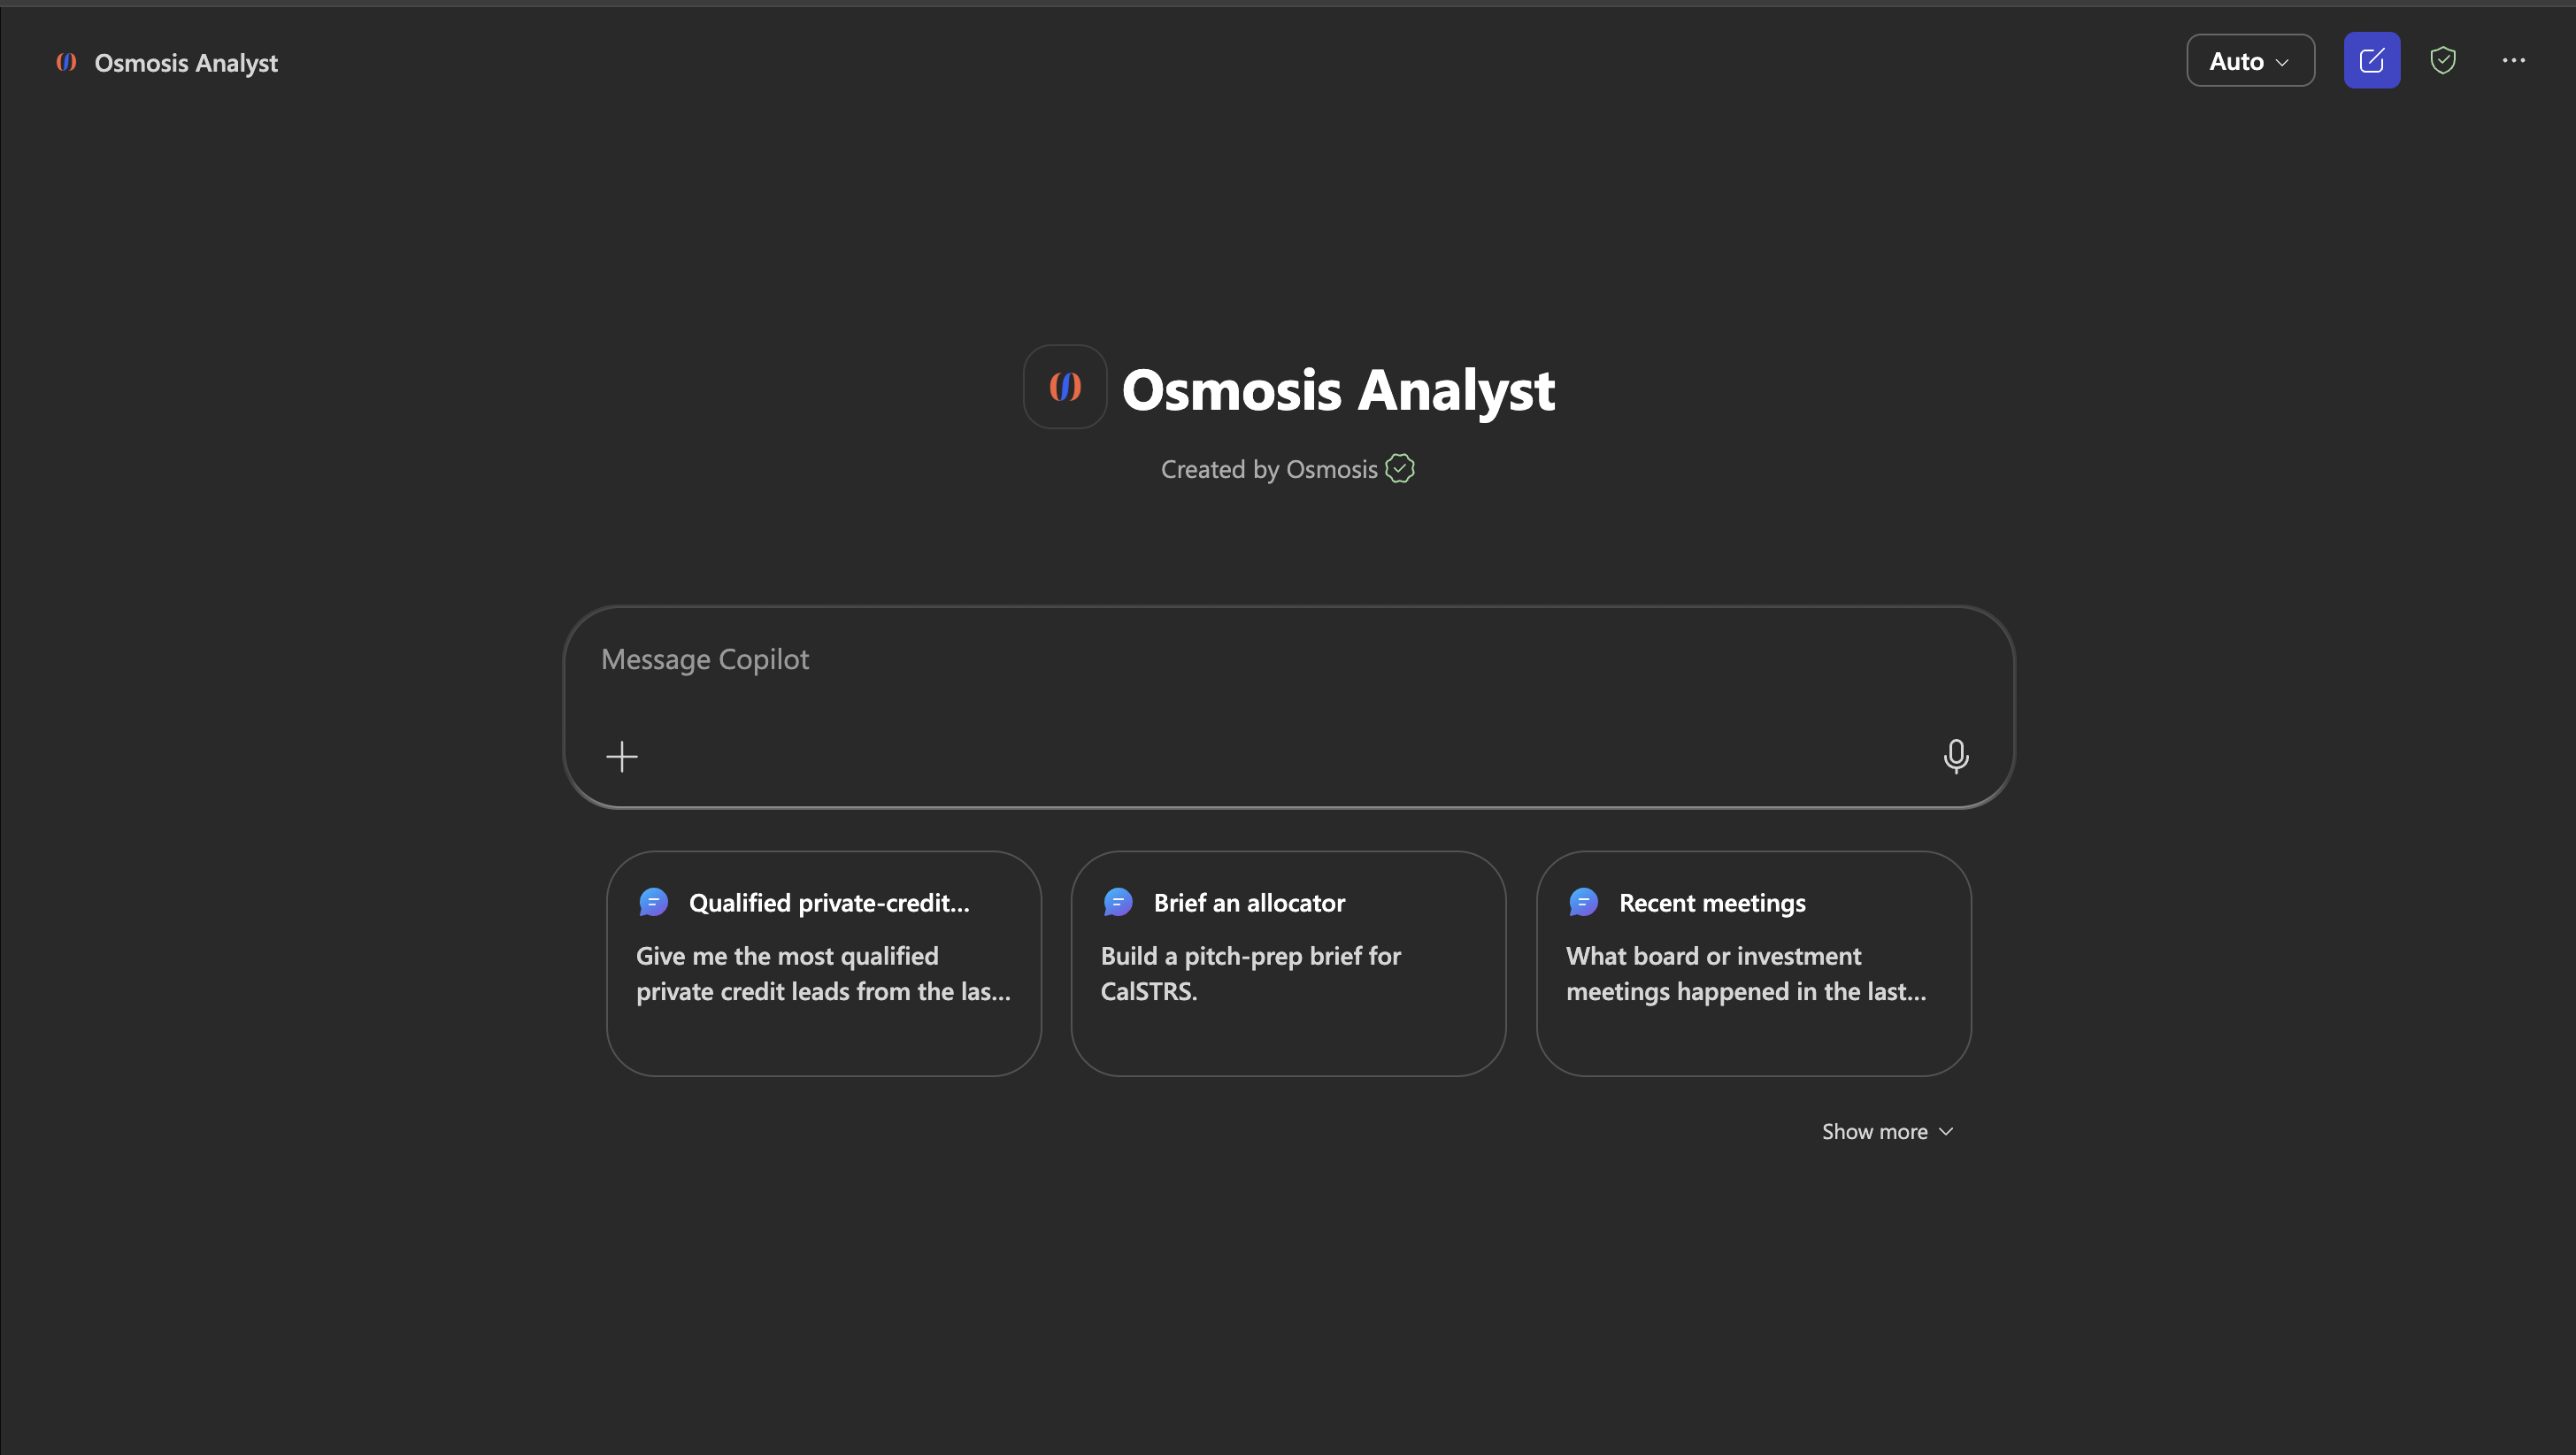
Microsoft 365 Copilot reaches the Analyst through a custom agent. Once it’s been added to your tenant, the Osmosis Analyst is available in Microsoft 365 Copilot Chat — in Teams, on microsoft365.com, or the Microsoft 365 Copilot app. Open the agent, sign in once with your Osmosis account, and it’s ready to use.
1. Open the Osmosis Analyst agent
In Microsoft 365 Copilot Chat, open the agents panel and select Osmosis Analyst. You can start from one of its suggested prompts or just type your own question.
2. Sign in to Osmosis
The first time you ask a question that needs Osmosis data, Copilot shows a Sign in to Osmosis Analyst card. Select it, sign in with your Osmosis email and password (or Sign in with Google), and approve. Copilot remembers the session, so you won’t need to sign in again for a while.
3. Use it in a chat
That’s it — Copilot calls the Analyst automatically when a question needs allocator data. Ask in plain language and it answers from live Osmosis data. Copilot may show a short confirmation before it runs a tool the first time — confirm to continue. See Example prompts for ideas.
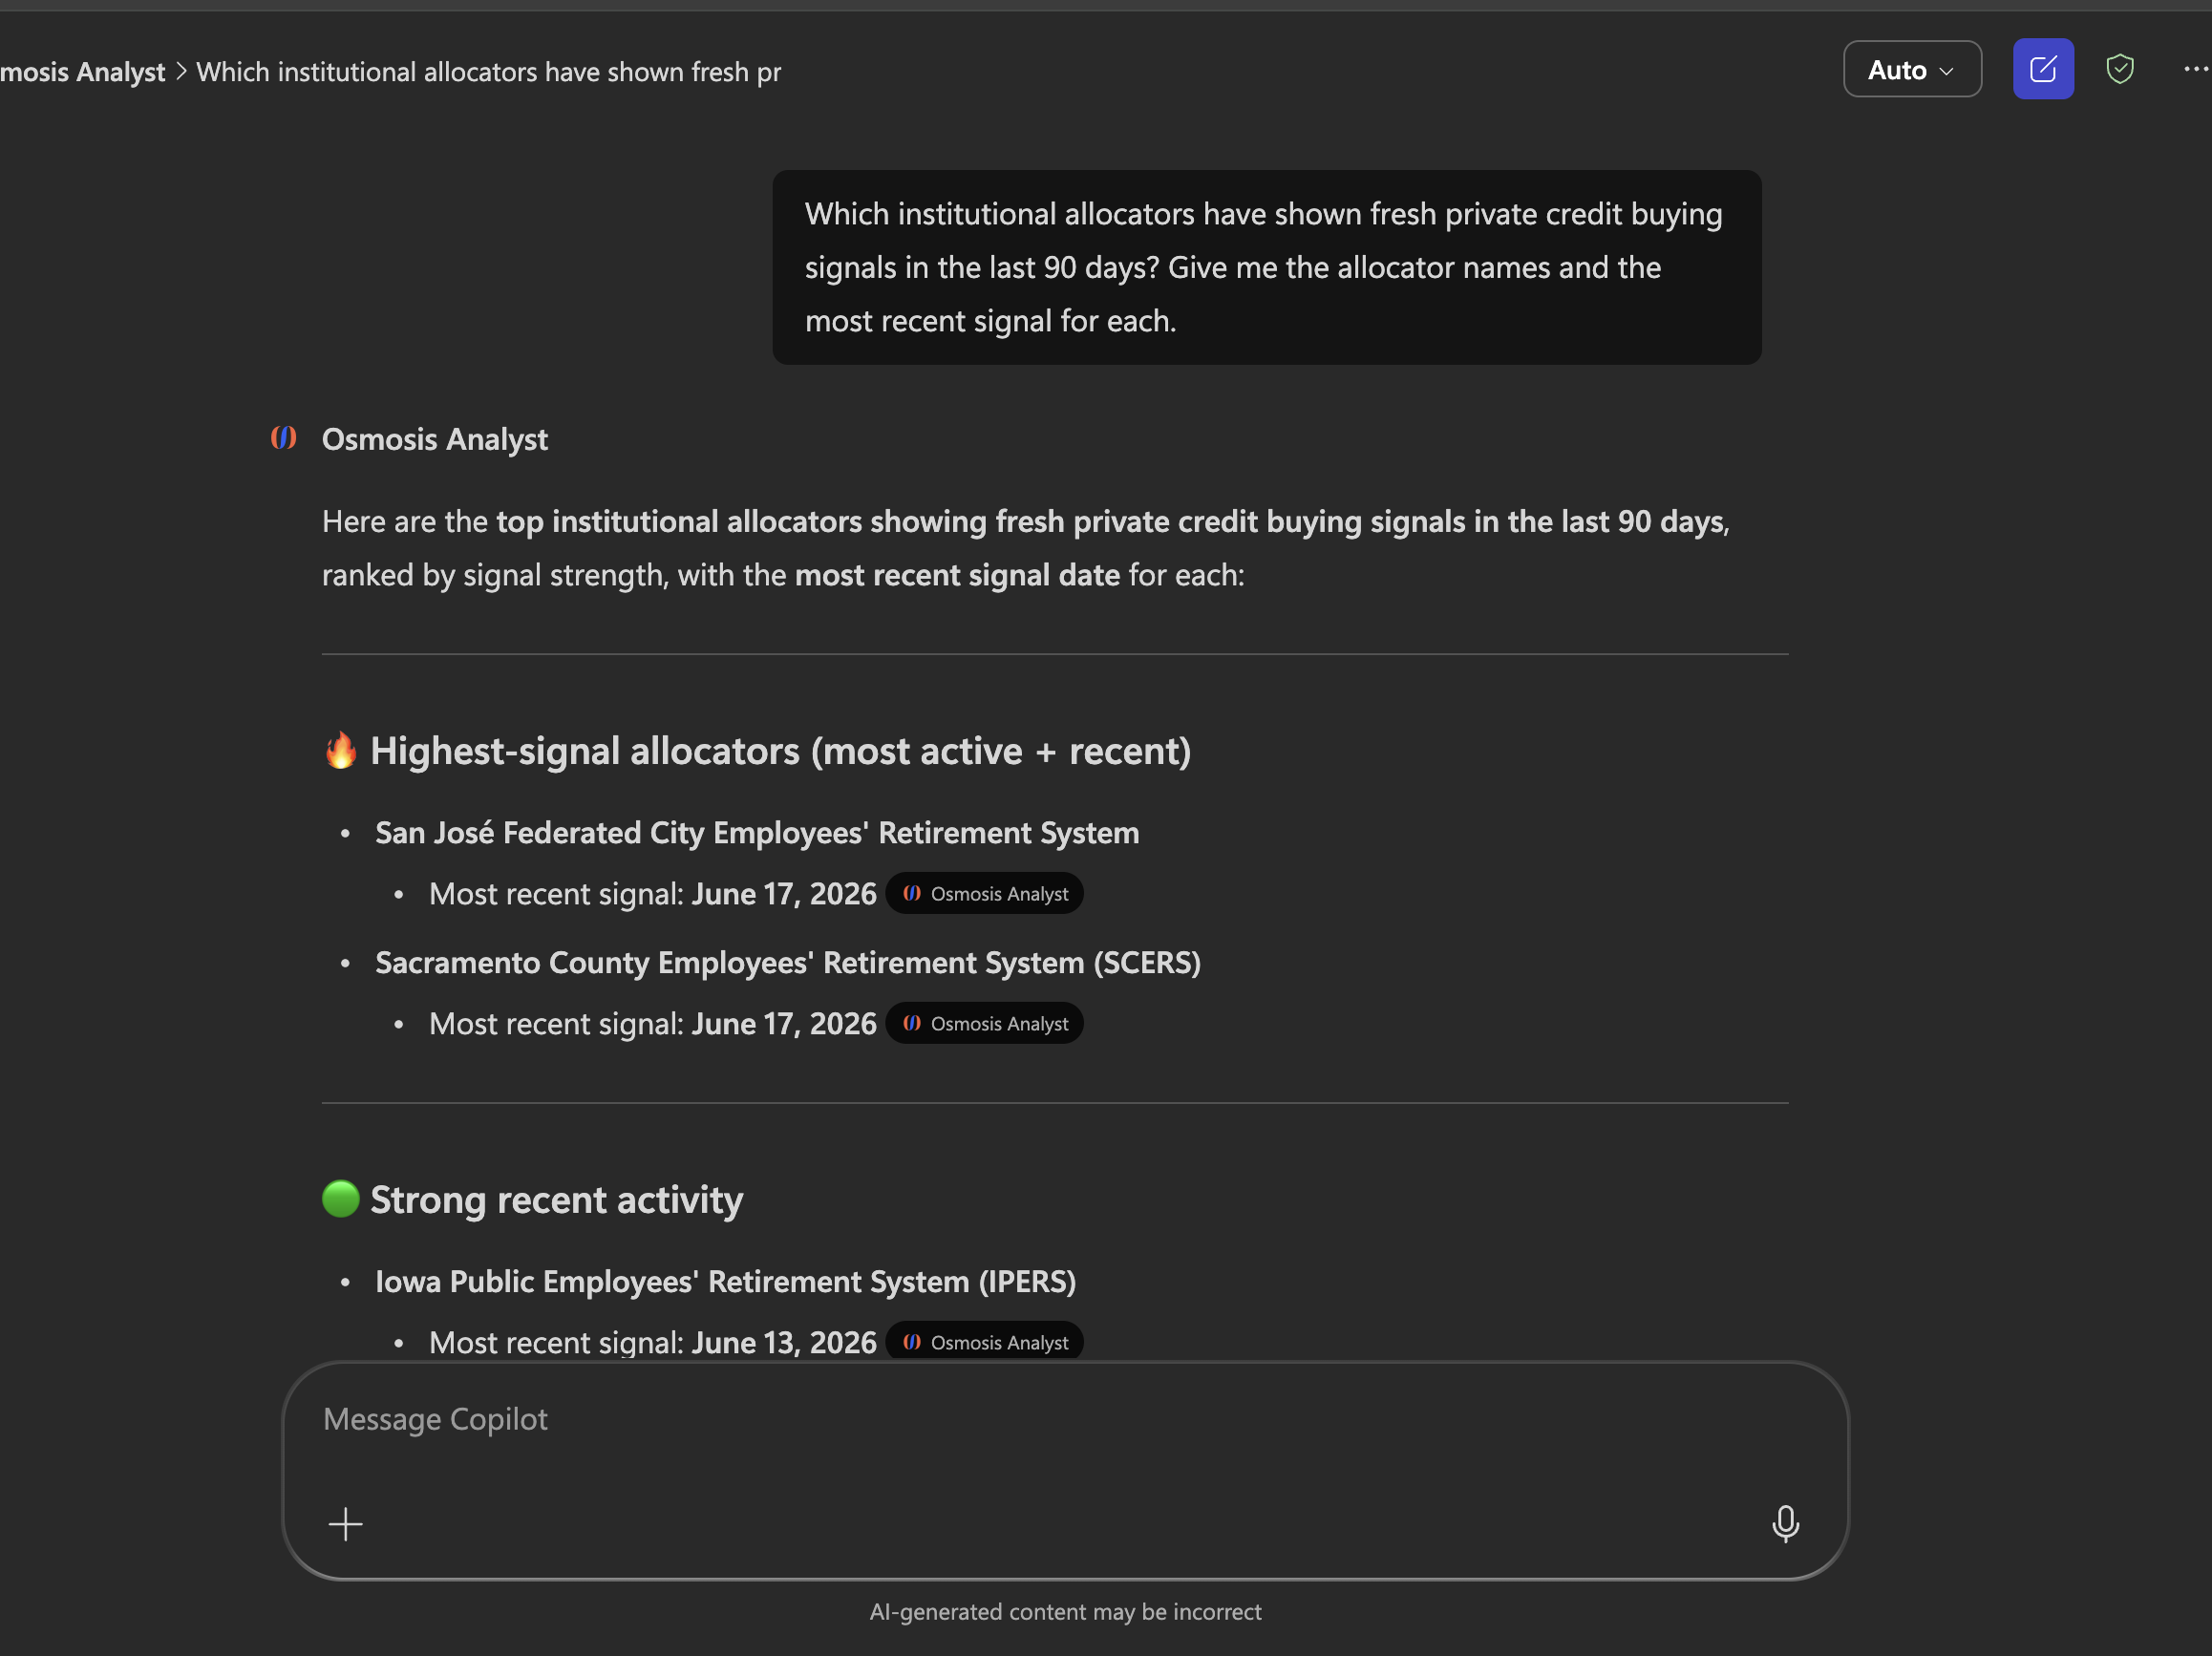
Copilot reaches the Analyst as a custom agent your admin adds to the tenant once — there’s nothing for individual users to install. After that it works in Copilot Chat across Teams, the web, and the desktop app, and you sign in with your Osmosis account just like the other clients.
Connect with Microsoft 365 Copilot
Using the Osmosis Analyst in Microsoft 365 Copilot requires Microsoft 365 Copilot access — a per-user license or pay-as-you-go — and your organization’s Microsoft 365 admin must add the Osmosis Analyst agent to your tenant first.
Microsoft 365 Copilot reaches the Analyst through a custom agent. Once it’s been added to your tenant, the Osmosis Analyst is available in Microsoft 365 Copilot Chat — in Teams, on microsoft365.com, or the Microsoft 365 Copilot app. Open the agent, sign in once with your Osmosis account, and it’s ready to use.
1. Open the Osmosis Analyst agent
In Microsoft 365 Copilot Chat, open the agents panel and select Osmosis Analyst. You can start from one of its suggested prompts or just type your own question.
2. Sign in to Osmosis
The first time you ask a question that needs Osmosis data, Copilot shows a Sign in to Osmosis Analyst card. Select it, sign in with your Osmosis email and password (or Sign in with Google), and approve. Copilot remembers the session, so you won’t need to sign in again for a while.
3. Use it in a chat
That’s it — Copilot calls the Analyst automatically when a question needs allocator data. Ask in plain language and it answers from live Osmosis data. Copilot may show a short confirmation before it runs a tool the first time — confirm to continue. See Example prompts for ideas.
Copilot reaches the Analyst as a custom agent your admin adds to the tenant once — there’s nothing for individual users to install. After that it works in Copilot Chat across Teams, the web, and the desktop app, and you sign in with your Osmosis account just like the other clients.
Example Prompts
Once connected, just ask in plain language. A few to try:
- “Brief me on CalPERS.”
- “Which allocators are active in private credit right now?”
- “Compare Texas TRS and CalSTRS.”
- “List recent board meetings for CalSTRS.”
- “Who sits on the board of the New York State Common Retirement Fund?”
- “Show me recent personnel moves across the allocators you track.”
- “Which consultants have been most active in real estate lately?”
Example Prompts
Once connected, just ask in plain language. A few to try:
- “Brief me on CalPERS.”
- “Which allocators are active in private credit right now?”
- “Compare Texas TRS and CalSTRS.”
- “List recent board meetings for CalSTRS.”
- “Who sits on the board of the New York State Common Retirement Fund?”
- “Show me recent personnel moves across the allocators you track.”
- “Which consultants have been most active in real estate lately?”
Troubleshooting
- Sign-in expired / connection stopped working — Your Osmosis sign-in persists for up to a week and normally refreshes on its own; you should rarely need to sign in again. If a client gets stuck, re-run its authenticate step (Claude Desktop: Customize → Connectors, then reconnect the Osmosis Analyst; Claude Code: open
/mcp, select the server, and choose Authenticate; ChatGPT: reconnect the connector under Settings → Apps). - Claude doesn’t call the tools — In Claude Desktop, check Customize → Connectors shows the Osmosis Analyst as connected, that its Tool permissions aren’t set to deny, and that it’s toggled on in the chat’s search and tools menu.
- Claude Code doesn’t show the server — Run
/statusand confirm you’re signed in with your Claude account. claude.ai connectors aren’t loaded whenANTHROPIC_API_KEY,ANTHROPIC_AUTH_TOKEN,apiKeyHelper, or a provider like Amazon Bedrock or Google Cloud is the active auth method — unset it and run/login. Also check the Show unused connectors row at the end of the claude.ai section in/mcp. - Claude Code shows the connector as hidden — You’ve added the server locally and have it as a claude.ai connector at the same URL; the local one wins. Run
claude mcp remove osmosis-toolsto fall back to the org connector and its tool permissions. - ChatGPT doesn’t call the tools — Confirm Developer Mode is on, the Osmosis Analyst app is toggled on via + → More → Developer mode in that chat, and you’re on the web (not mobile). You can refresh the tool list on the connector’s settings page.
- ChatGPT sign-in window never opens — Allow pop-ups from chatgpt.com and try again.
- Microsoft 365 Copilot doesn’t show the agent or never asks you to sign in — Confirm your admin has added the Osmosis Analyst to your tenant and that you have Microsoft 365 Copilot access. Open the Osmosis Analyst agent in a new chat and ask a question to trigger the sign-in card.
- Still stuck? — Reach out to your Osmosis representative and we’ll help get you connected.
There are no API keys to manage — every client authenticates through your browser with your Osmosis account.
Troubleshooting
- Sign-in expired / connection stopped working — Your Osmosis sign-in persists for up to a week and normally refreshes on its own; you should rarely need to sign in again. If a client gets stuck, re-run its authenticate step (Claude Desktop: Customize → Connectors, then reconnect the Osmosis Analyst; Claude Code: open
/mcp, select the server, and choose Authenticate; ChatGPT: reconnect the connector under Settings → Apps). - Claude doesn’t call the tools — In Claude Desktop, check Customize → Connectors shows the Osmosis Analyst as connected, that its Tool permissions aren’t set to deny, and that it’s toggled on in the chat’s search and tools menu.
- Claude Code doesn’t show the server — Run
/statusand confirm you’re signed in with your Claude account. claude.ai connectors aren’t loaded whenANTHROPIC_API_KEY,ANTHROPIC_AUTH_TOKEN,apiKeyHelper, or a provider like Amazon Bedrock or Google Cloud is the active auth method — unset it and run/login. Also check the Show unused connectors row at the end of the claude.ai section in/mcp. - Claude Code shows the connector as hidden — You’ve added the server locally and have it as a claude.ai connector at the same URL; the local one wins. Run
claude mcp remove osmosis-toolsto fall back to the org connector and its tool permissions. - ChatGPT doesn’t call the tools — Confirm Developer Mode is on, the Osmosis Analyst app is toggled on via + → More → Developer mode in that chat, and you’re on the web (not mobile). You can refresh the tool list on the connector’s settings page.
- ChatGPT sign-in window never opens — Allow pop-ups from chatgpt.com and try again.
- Microsoft 365 Copilot doesn’t show the agent or never asks you to sign in — Confirm your admin has added the Osmosis Analyst to your tenant and that you have Microsoft 365 Copilot access. Open the Osmosis Analyst agent in a new chat and ask a question to trigger the sign-in card.
- Still stuck? — Reach out to your Osmosis representative and we’ll help get you connected.
There are no API keys to manage — every client authenticates through your browser with your Osmosis account.